

Duo SCIM
Configure Duo to automatically provision users in Doppler using SCIM.
This guide will show you how to set up Duo automated provisioning to automatically provision and manage user access to Doppler over SCIM 2.0.
Requirements
- Enterprise subscription
- Domain Verified (Settings page)
- Duo account with access to the Duo Admin Panel
- Duo SAML application for Doppler
Doppler will only provision users whose email address belongs to a verified domain on your workplace. Provisioning a user on an unverified domain fails with
Unable to add a user with an email address from an unverified domain for security purposes.Verify your domain before you begin.
Enable SCIM in Doppler
In a separate tab, browse to your Doppler workplace. Click on the Team link in the left navigation menu and then click on the SSO tab.
Scroll down to the SCIM 2.0 section, choose Enabled from the status dropdown menu, and then click Save.
After doing so, a new Base URI and Authentication option will appear. These will both be used in the next section to further configure Duo SCIM provisioning, so leave this tab open.
Roll a Doppler SCIM Token
In your Doppler workplace tab, click on the Manage link next to the Authentication option in the SCIM 2.0 section. You'll be taken to the SCIM section of the Tokens page of your Doppler workplace.
The next step involves rolling your SCIM token. If you're setting up SCIM for the first time, it's fine to proceed with this operation. However, if you had already setup SCIM previously keep in mind that performing a roll will invalidate the old token, so any existing SCIM setup using that token will stop working until it's updated with the new token.
Once there, click on the Roll link. This will open up a new dialog containing the new token. Copy the token by clicking on the clipboard icon next to it.
Swap back to the SSO tab in Doppler and copy the contents of the Base URI field by clicking the clipboard icon next to it. Keep both the Base URI and the SCIM token handy. You'll paste them into Duo in the next section.
Configure Duo SCIM Authentication
This guide assumes you've already setup a Duo SAML application for Doppler. If you haven't, please follow that link and create one before continuing. SCIM provisioning is configured on that same application, not on a new one.
Open up a new browser tab and browse to your Duo Admin Panel. Navigate to Applications → Applications and click on your existing Duo SAML application for Doppler. Click the Provisioning tab at the top of the application configuration page (1) to begin your automated provisioning setup.
In the Authentication section, choose Bearer Token from the Authentication mode dropdown menu.
Paste the Base URI value you copied from Doppler into the Base URL field (2), and paste the SCIM token you copied from Doppler into the Token field. Then click the Connect to application button.
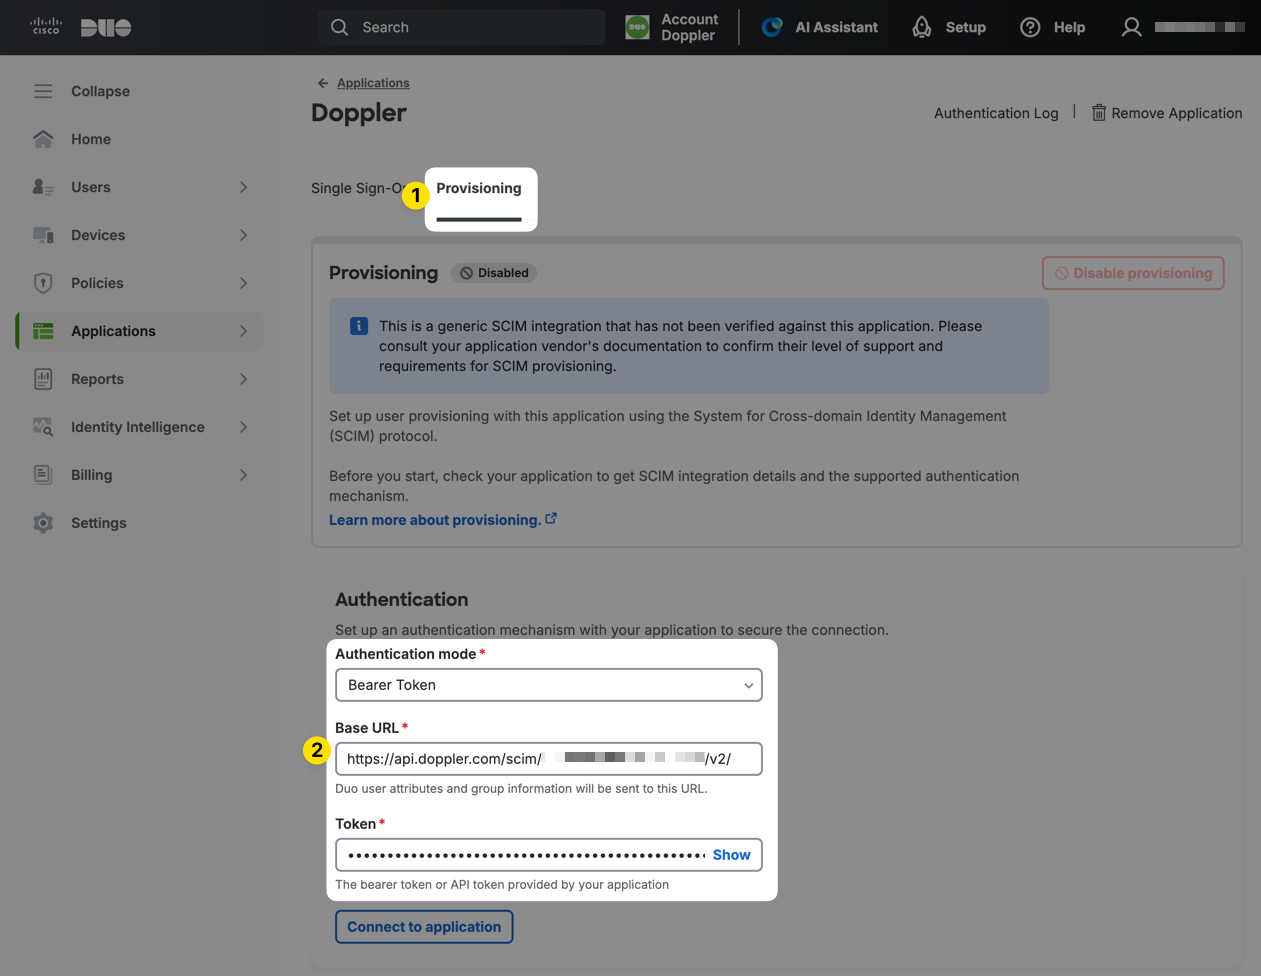
The Base URL will look similar to https://api.doppler.com/scim/$WORKPLACE/v2/.
If your Doppler Base URI and SCIM token are correct, you'll see a Successfully connected to the Application confirmation message below the form. You will not be able to proceed to attribute mapping until the connection succeeds.
Configure Attribute Mapping
After the connection succeeds, scroll down to the Attribute mapping section and click + Edit mappings to add the attributes Doppler needs (1).
Map the following Duo user attributes:
| Duo user attribute | Application attribute | Notes |
|---|---|---|
| Email Address | userName | Required. Doppler uses this as the user's email address and as the unique identifier for the user. |
| Display Name | name.formatted | Required. Doppler uses this to populate the user's display name when their account is created. |
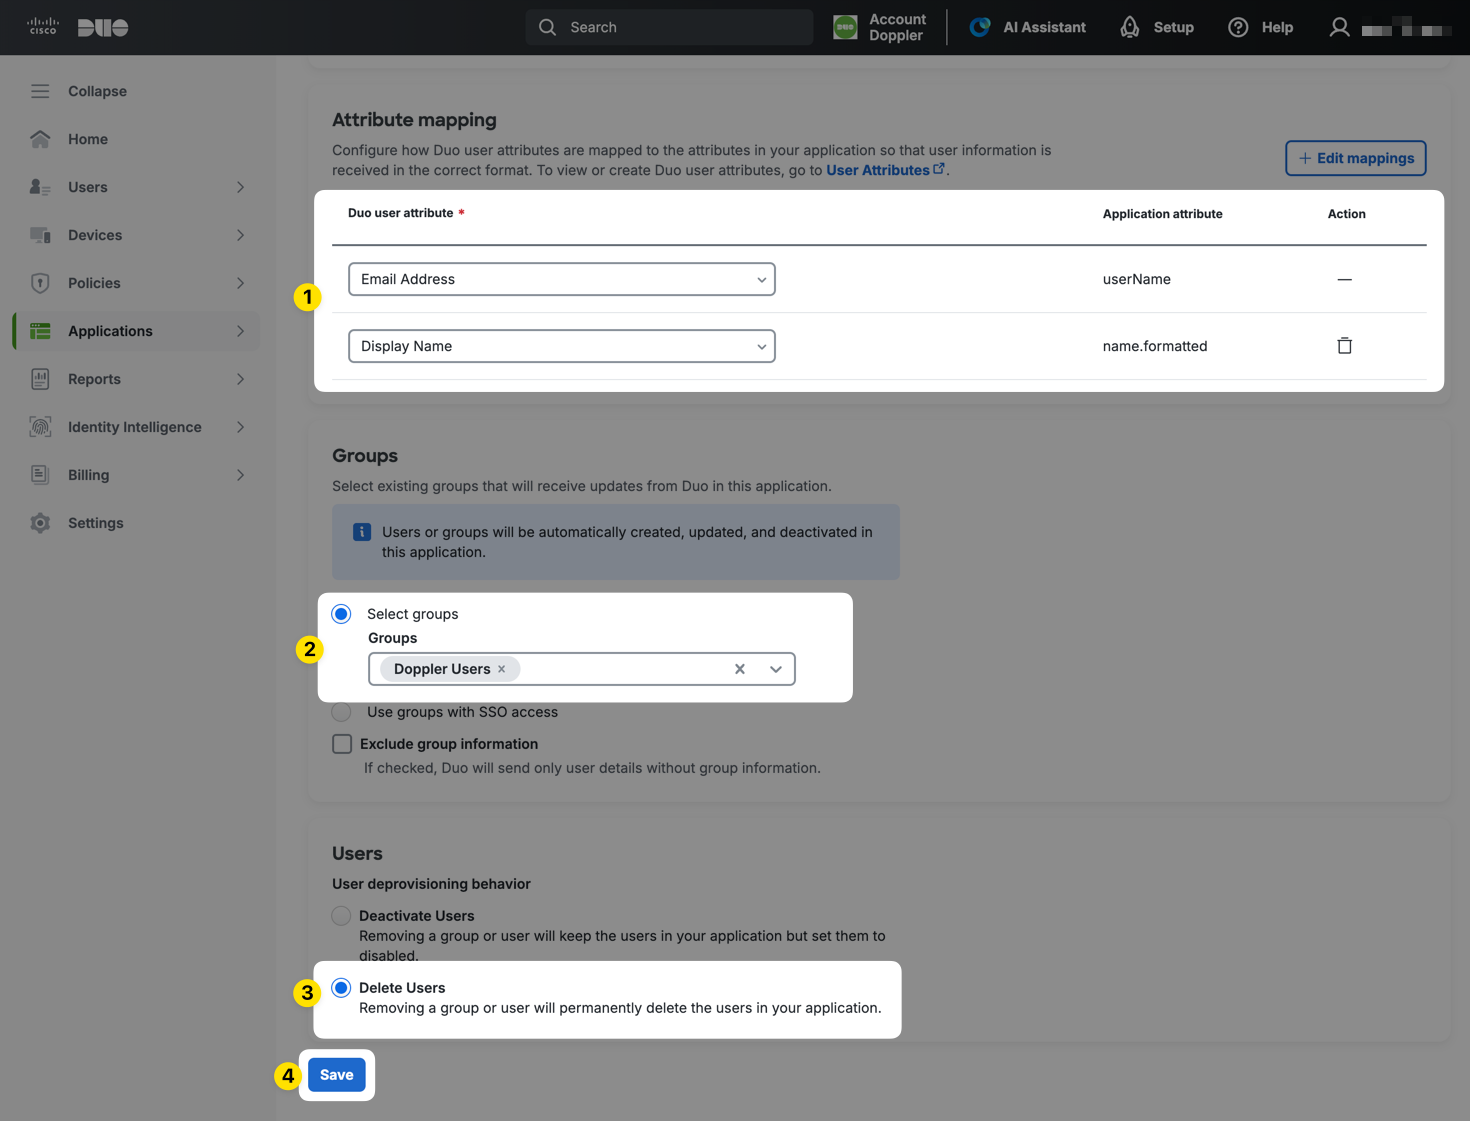
The screenshot above also shows the Groups (2), Users (3), and Save (4) controls covered in the next three sections.
Map Email Address touserName, notemailsDoppler requires the user's email address in the
userNameattribute. Mapping Duo's Email Address attribute toemailsinstead will cause the sync to fail withPlease provide a valid email address., becauseuserNamenever arrives.The
emailsattribute is optional in Doppler and you don't need to map it at all. If you do map it, at least one of its values must be identical touserName, or the sync fails with'emails' must contain 'userName'.
The
userNamerow cannot be removed, which is why its Action column shows a dash rather than a delete icon. Thename.formattedrow is one you add yourself, so it can be deleted.Doppler will also accept a name supplied as
name.givenNameandname.familyNameinstead ofname.formatted, but a name in some form is required. User creation fails withUser's name must be providedif neither is present.
Once you've set your mappings, click Save mapping.
Configure Group Provisioning
When setting this up, we assume you've not created any groups in your Doppler workplace prior to enabling SCIM. If you had, and the name of a Duo group you push matches the name of an existing Doppler group, the two will be linked rather than creating a new group. Generally, we recommend setting this up without any pre-existing groups in Doppler.
In the Groups section, choose Select groups and pick the Duo groups you want to push to Doppler (2). Once you save, Duo will create matching groups in Doppler and keep their membership in sync.
Alternatively, choosing Use groups with SSO access will push the same groups you permitted in the User access setting of your Duo SAML application.
You can manage which users are provisioned to Doppler by managing the membership of the Duo groups you push. Users assigned to a pushed Duo group will be created in Doppler the next time Duo synchronizes; users removed from all pushed groups are deprovisioned according to the behavior you select below.
Leave Exclude group information unchecked so that Duo sends group membership along with user details.
Configure User Deprovisioning Behavior
In the Users section, choose how Duo should handle a user that's removed from a pushed group (3):
- Deactivate Users: Duo marks the user inactive in Doppler.
- Delete Users: Duo deletes the user in Doppler.
Doppler treats both options the same way: the user's workplace seat is removed, which revokes their access to your workplace. Their Doppler user account isn't deleted, so if they're provisioned again later they receive a new seat.
Save and Synchronize
Once your authentication, attribute mapping, group selection, and deprovisioning behavior are all set, click Save (4) to start synchronization.
You should be able to see the synced users and groups in Doppler once the initial sync completes.
Now, whenever users are added, updated, or deactivated in Duo, Doppler will receive the relevant API calls to sync changes to its user records.
Troubleshooting
| Error | Cause |
|---|---|
Please provide a valid email address. | The userName attribute is missing or isn't a valid email address. Most commonly caused by mapping Duo's Email Address attribute to emails instead of userName. |
'emails' must contain 'userName' | You mapped emails, but its value doesn't match userName exactly. Either remove the emails mapping or point both at the same Duo attribute. |
User's name must be provided | No name attribute was sent. Map Display Name to name.formatted. |
Unable to add a user with an email address from an unverified domain for security purposes. | The user's email domain isn't verified on your Doppler workplace. Verify the domain on the Settings page. |
The name may not be changed for users NOT belonging to a verified domain on your workplace. | Doppler refuses profile updates for users outside your verified domains. The same restriction applies to email and password changes. |
Also check:
- Confirm the Base URL ends in
/v2/and matches the Base URI shown in Doppler's SCIM 2.0 section exactly. - If the connection test worked previously and now fails, check whether the Doppler SCIM token was rolled. Rolling invalidates the old token.
If you're still running into issues, contact our support team with the timestamp of a failed sync so we can look up the request.
Updated about 2 months ago