

Duo SAML SSO
Learn how to create a custom Duo Generic SAML 2.0 application for Doppler Single Sign-On.
Requirements
- Workplace domain verified (Settings page)
- Duo account with access to the Duo Admin Panel and an active Duo Single Sign-On configuration (including a configured authentication source)
1. Initial Doppler SAML SSO Configuration
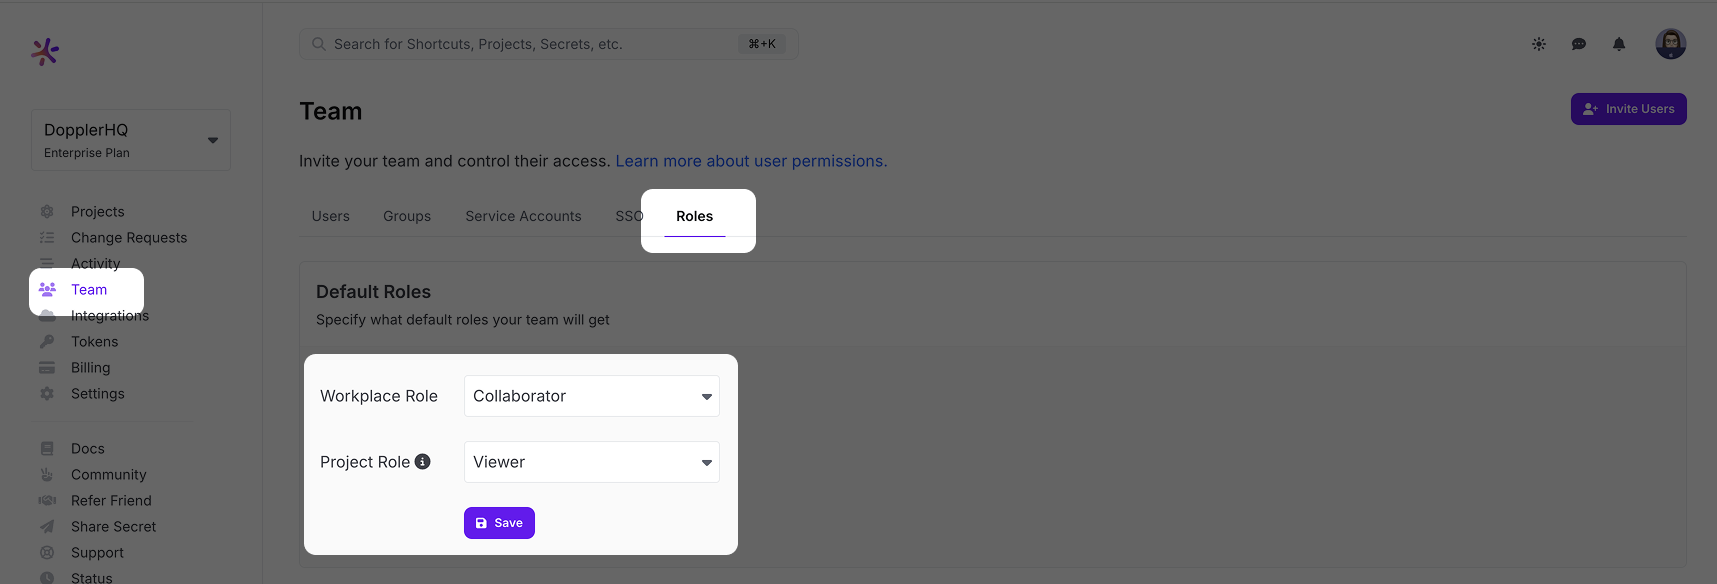
Go to the Doppler dashboard and from the menu click Team, then select the Roles tab from the top menu. Choose the Default Roles for users who login via SSO.
The Workplace Role controls the initial permissions a user will receive when their account is created. We recommend keeping it at Collaborator access to follow the principle of least privilege. The Project Role is the role granted to a user when they're added to a project, so set this to the role most commonly used. Users with the Owner role can adjust these after the user has logged in once. If you scroll down further on the Roles page, you'll see a breakdown of what permissions each Role has.
After setting the Default Roles, we need to enable SAML SSO in Doppler to get access to the URLs needed to configure the third party SAML SSO application.
Select the SSO tab from the top menu and scroll down to the SAML Single Sign-On section. Click the Add SAML button.

Next, choose a verified domain from the dropdown menu and click Save.
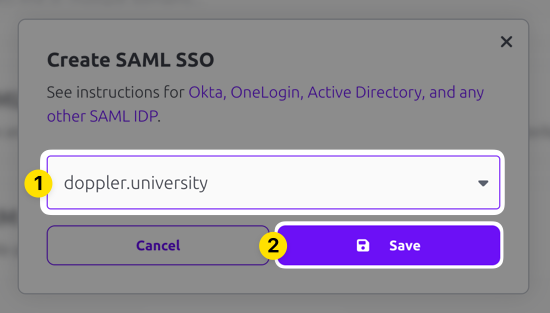
SAML SSO configuration requires having a domain associated with it because users login using their email address and the domain of that address is mapped back to your SAML SSO login. Verification is required when you add the domain to your account to confirm your ownership of the domain.
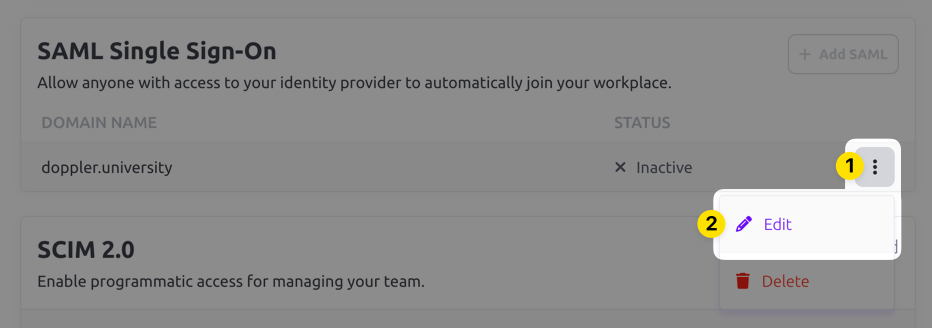
The domain you selected should show up now in the Inactive state. Click on the three dot menu and choose the Edit option.
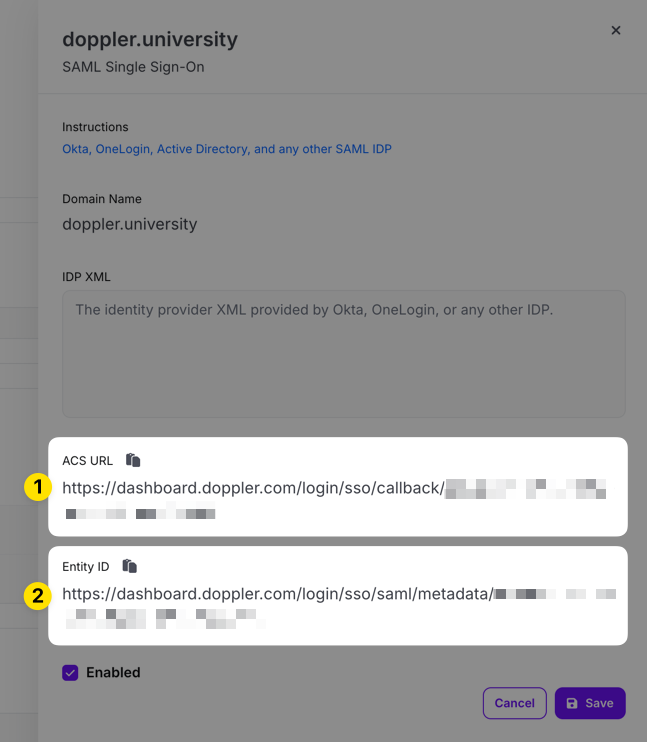
Copy the ACS URL and Entity ID URLs in the edit drawer that appears for use when configuring the third party SAML SSO application.
2. Create SAML Application
In a separate window, browse to your Duo Admin Panel and select Applications → Application Catalog from the left navigation menu (1).
Search for generic saml (2), then locate the Generic SAML Service Provider result and click the + Add button (3).
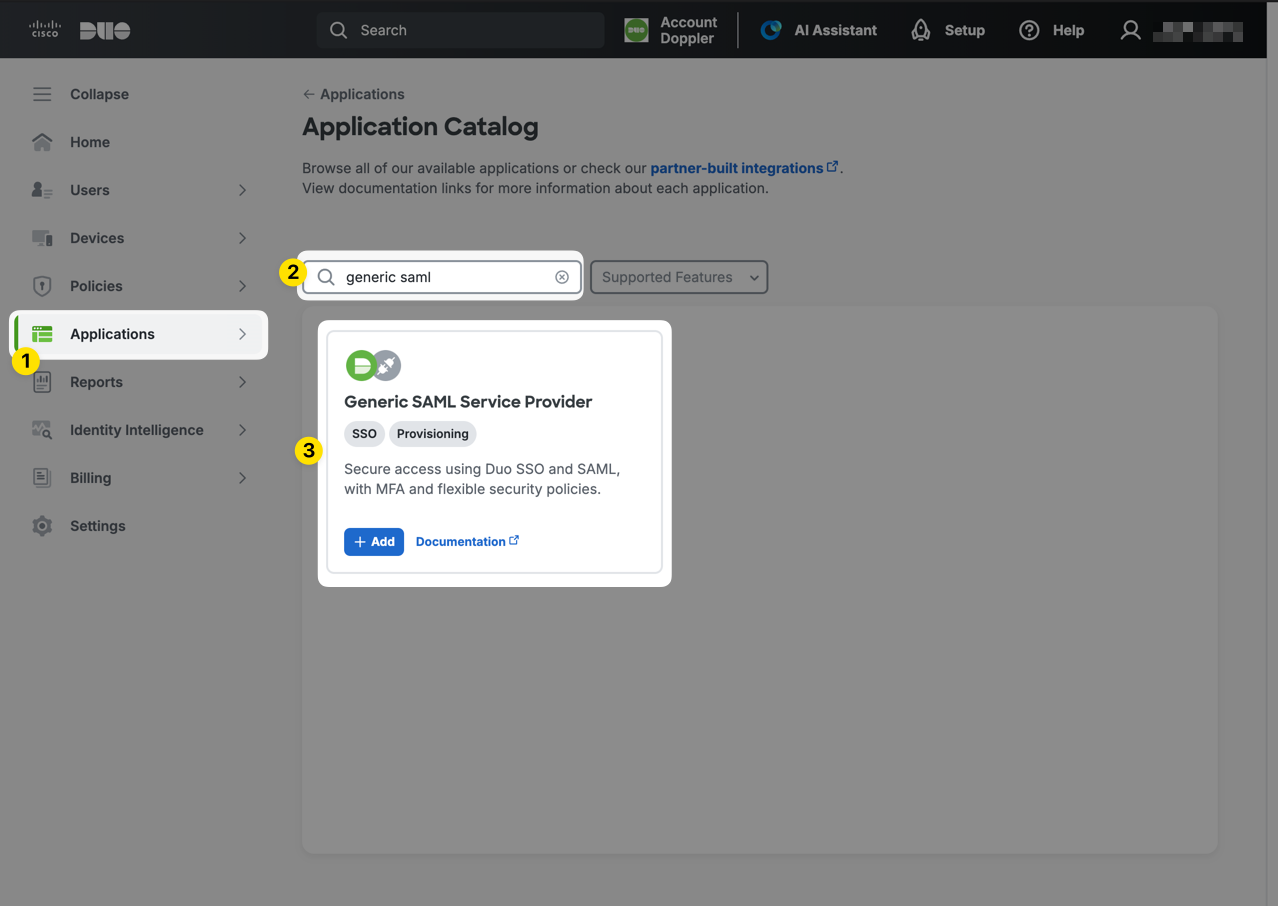
The Generic SAML Service Provider entry carries both the SSO and Provisioning labels. The same application also handles SCIM provisioning, so you don't need to create a second one for it.
3. Name the Application and Grant Access
You'll land on the application's configuration page with the Single Sign-On tab selected (1).
In the Basic Configuration section, set the Application name to something recognizable such as Doppler (2).
Use the User access setting to control who can sign in to Doppler through this application (3). We recommend selecting Enable only for permitted groups and choosing a group such as Doppler Users, which restricts access to the members of that group.
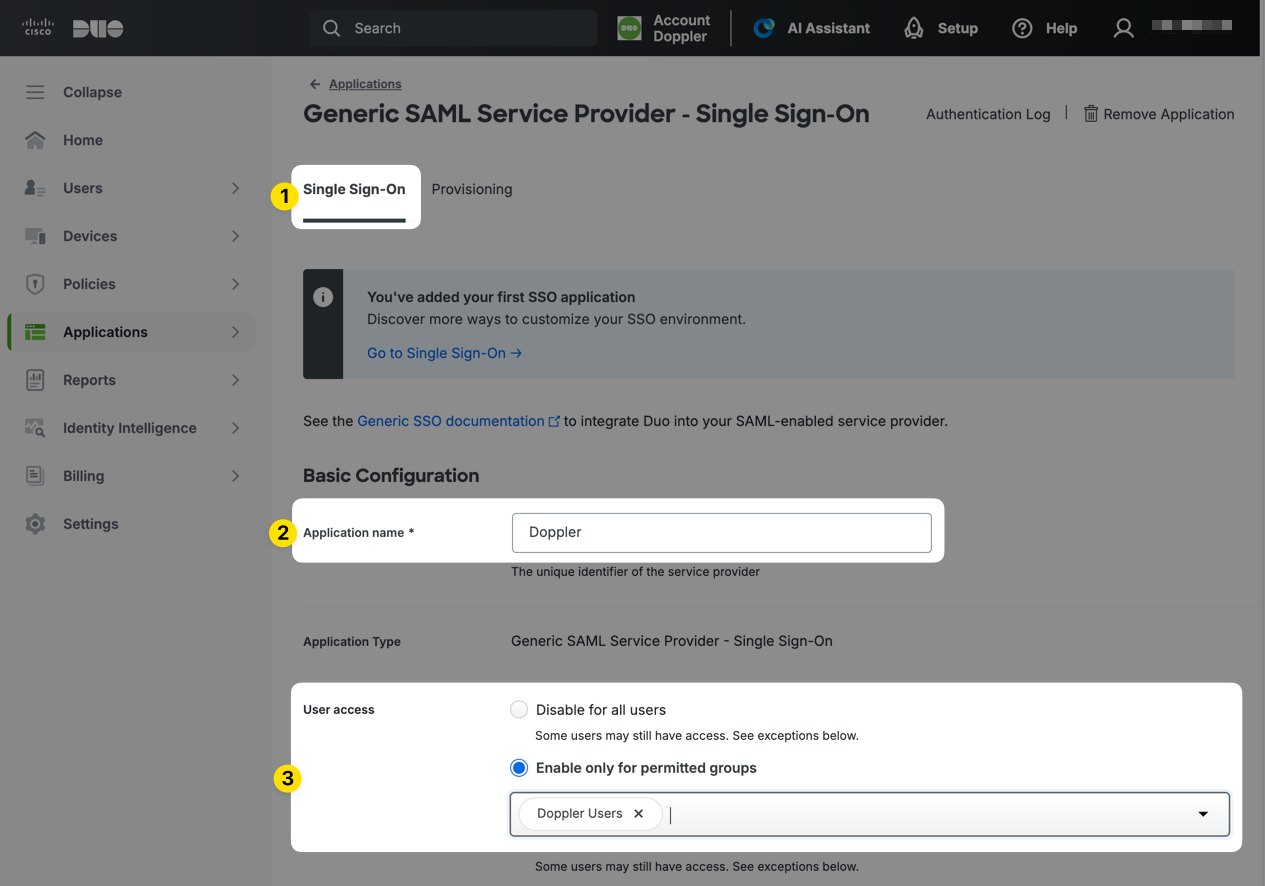
If you plan to set up SCIM provisioning afterwards, you can reuse the group you select here, since it already describes who should have Doppler access.
4. Configure the Service Provider URLs
Scroll down to the Service Provider section and leave Metadata Discovery set to None (manual input) so that you can enter the Doppler URLs by hand.
Populate the form with the URLs obtained from the Doppler SAML Single Sign-On setup page in Step 1 above (2). They will look similar to the following:
| Parameter | Value |
|---|---|
| Entity ID | https://dashboard.doppler.com/login/sso/saml/metadata/$UUID |
| Assertion Consumer Service (ACS) URL | https://dashboard.doppler.com/login/sso/callback/$UUID |
These are example URLs only and will not work in your setup. You need to use the URLs obtained from the Doppler SAML Single Sign-On setup page referenced in Step 1 above.
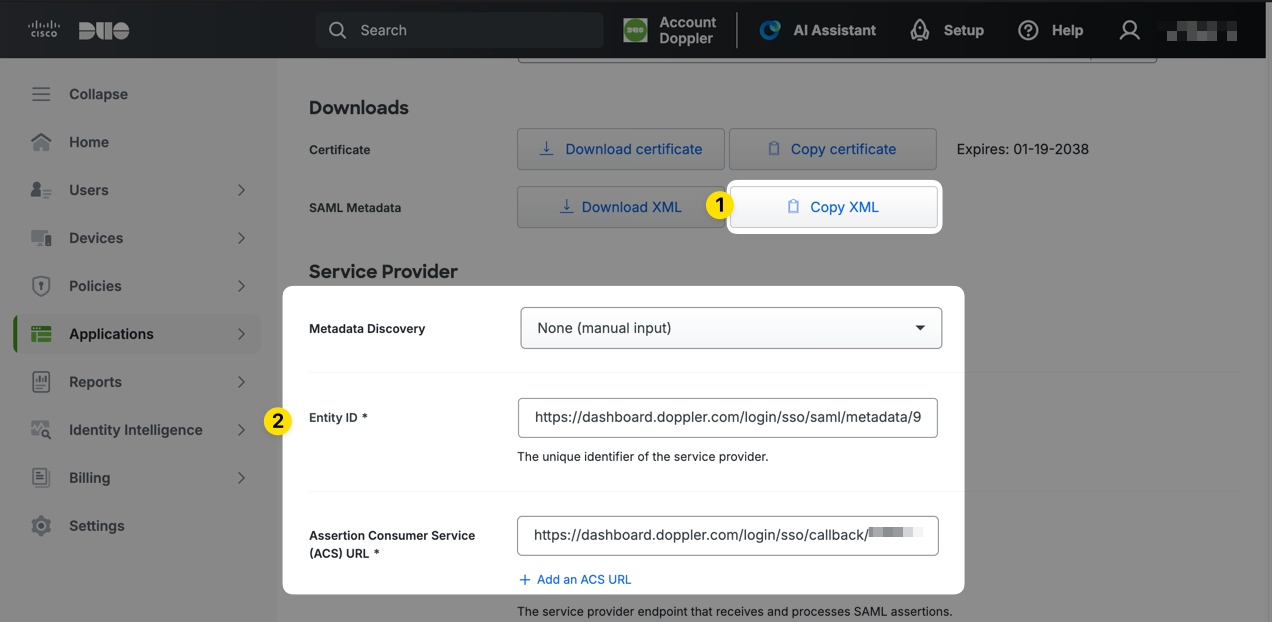
The Downloads section directly above Service Provider contains the Copy XML button (1), which you'll use in Step 6 after saving the application.
5. Configure the SAML Response
Scroll down to the SAML Response section and set the NameID format to urn:oasis:names:tc:SAML:1.1:nameid-format:emailAddress (1), then set the NameID attribute to <Email Address> (2).
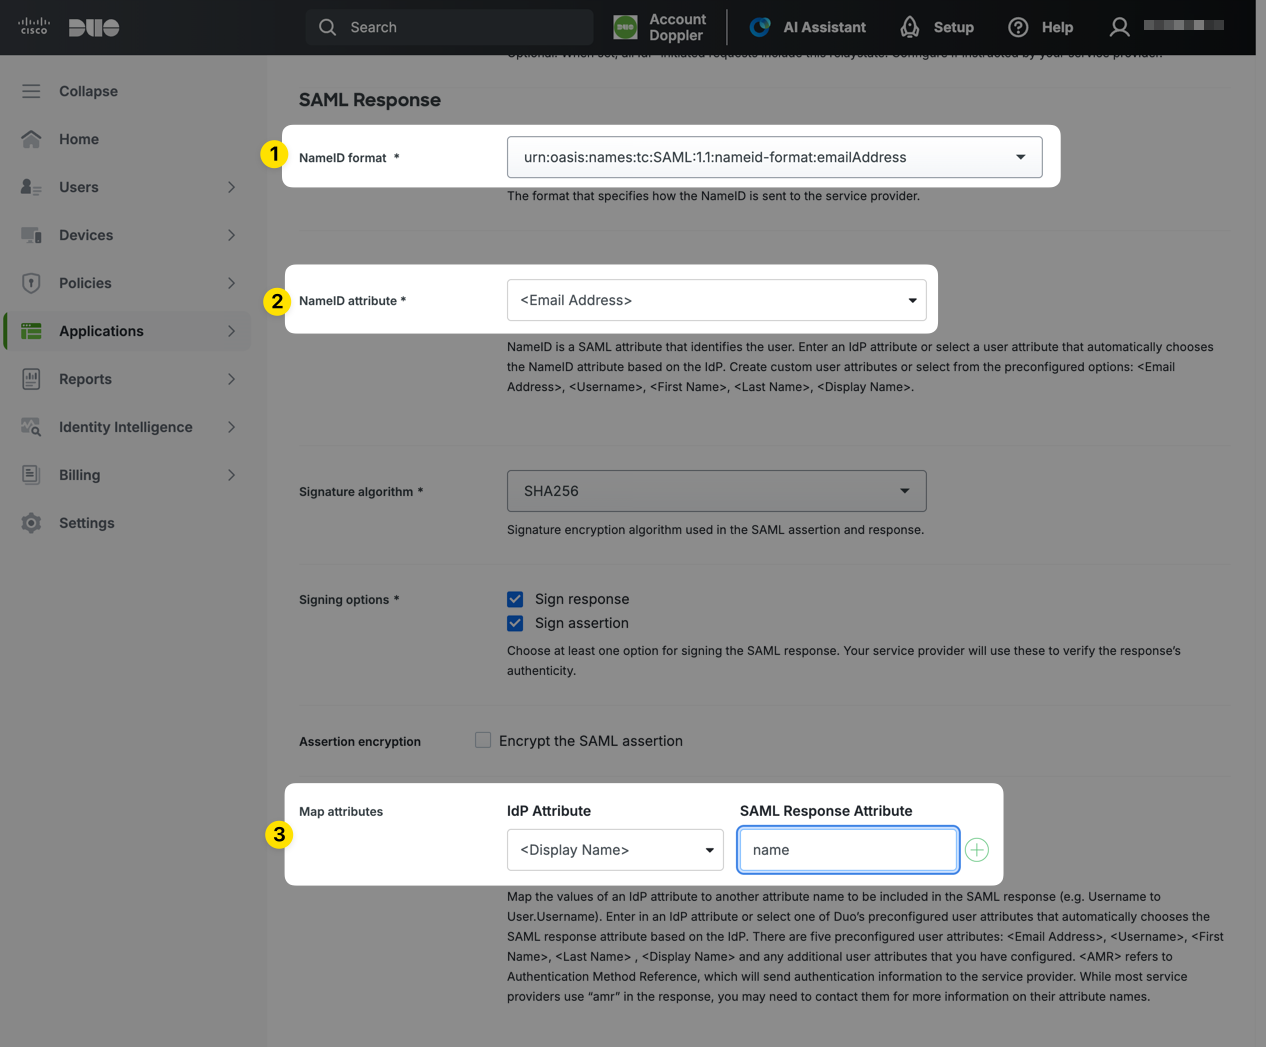
Doppler identifies users by email address, so the NameID attribute must resolve to the user's email address. If you use a custom authentication source attribute rather than Duo's preconfigured
<Email Address>value, make sure the attribute you choose contains a valid email address.
Leave Signature algorithm set to SHA256 and keep both Sign response and Sign assertion checked under Signing options.
In the Map attributes section, add a row that sends the user's display name to Doppler (3):
| IdP Attribute | SAML Response Attribute |
|---|---|
<Display Name> | name |
Click the + button to the right of the row to add it, then click Save at the bottom of the page.
Doppler uses the
nameSAML response attribute to populate the user's display name when their account is created. If your authentication source doesn't have a single display name attribute, you can use Duo's attribute transformations to combine first and last name values, or map an alternative attribute that contains a usable name value.
6. Copy the Duo Metadata XML
Scroll back up to the Downloads section shown in Step 4. Next to SAML Metadata, click the Copy XML button to copy the Duo IdP metadata to your clipboard.
Download XML works too, but then you have to open the saved file and select all of its contents. Copy XML copies the whole document.
7. Update Doppler SAML SSO Configuration
Navigate to the Doppler Team page and click on the SSO tab.
Scroll down to the SAML Single Sign-On section, click on the three dot menu, and choose the Edit option. Paste in the IDP XML metadata, check the Enabled field, then click the Save button.
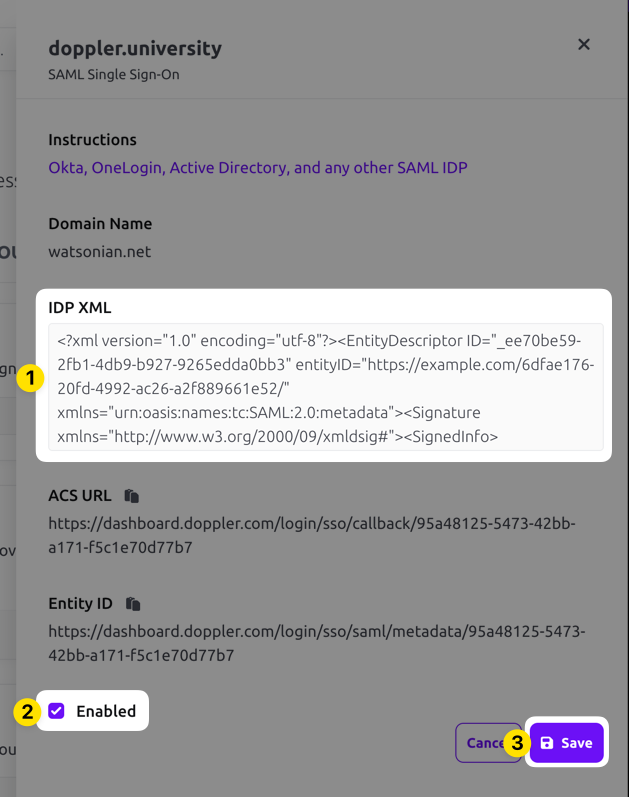
You're now ready to test the Duo application!
8. Testing
As a Duo administrator, it's presumed you'll know how to sufficiently test a new Duo application, but here is a general guide.
Test sign-in flow using incognito windowBe sure to stay signed in to the Doppler dashboard until you've verified the Duo sign-in flow from an incognito window.
Staying signed in to the dashboard will allow you to update the SAML settings or disable SAML SSO in the event of misconfiguration.
Confirm that your test user is a member of a group permitted by the User access setting you configured in Step 3.
Now test the Doppler SAML sign-in flow by opening an incognito window and browsing to the Doppler Login page. Enter the email address of the test user and click the Log In button. This should redirect you to the Duo sign-in flow for authentication.
After completing the Duo authentication prompt, you should be redirected to the Doppler dashboard for the assigned user.
Once you've verified the Doppler SAML application is configured correctly, you can then apply your standard organization policies for people and groups assignment.
Troubleshooting
Here are some general troubleshooting tips:
- Double-check that the Entity ID and Assertion Consumer Service (ACS) URL values match exactly what is displayed in the Doppler SAML section.
- Check that the NameID format is set to
urn:oasis:names:tc:SAML:1.1:nameid-format:emailAddressand that the NameID attribute resolves to the user's email address. - Ensure that the
nameSAML Response Attribute has been added to the Map attributes section, mapped from<Display Name>. - Verify that the test user is a member of a group permitted by the application's User access setting.
- Confirm you copied the entire contents of the Duo metadata XML into Doppler.
If you're still running into issues, the error page should present you with a requestId value that can be used by our support team for further diagnosis.
Next Steps
You can also set up Duo SCIM provisioning on the same application to automatically create, update, and deactivate Doppler users from Duo.
Updated about 2 months ago