Microsoft Entra ID SAML SSO
Learn how to configure Single Sign-On for Doppler using an Microsoft Entra ID SAML application.
This guide will show you how to create and configure a Microsoft Entra ID SAML application to enable Single Sign-On for Doppler.
Requirements
- Domain Verified (Settings page)
- Azure role with permissions to create enterprise applications: Global Administrator, Cloud Application Administrator, Application Administrator, or owner of the service principal.
Make sure you maintain at least one window or tab where you're logged into your Doppler account. This will allow you to disable SAML SSO in the event something goes wrong during the configuration process and will prevent you from locking yourself out of your account.
1. Create Custom SAML App
Go to the Entra ID console
Select Enterprise applications from the left menu.
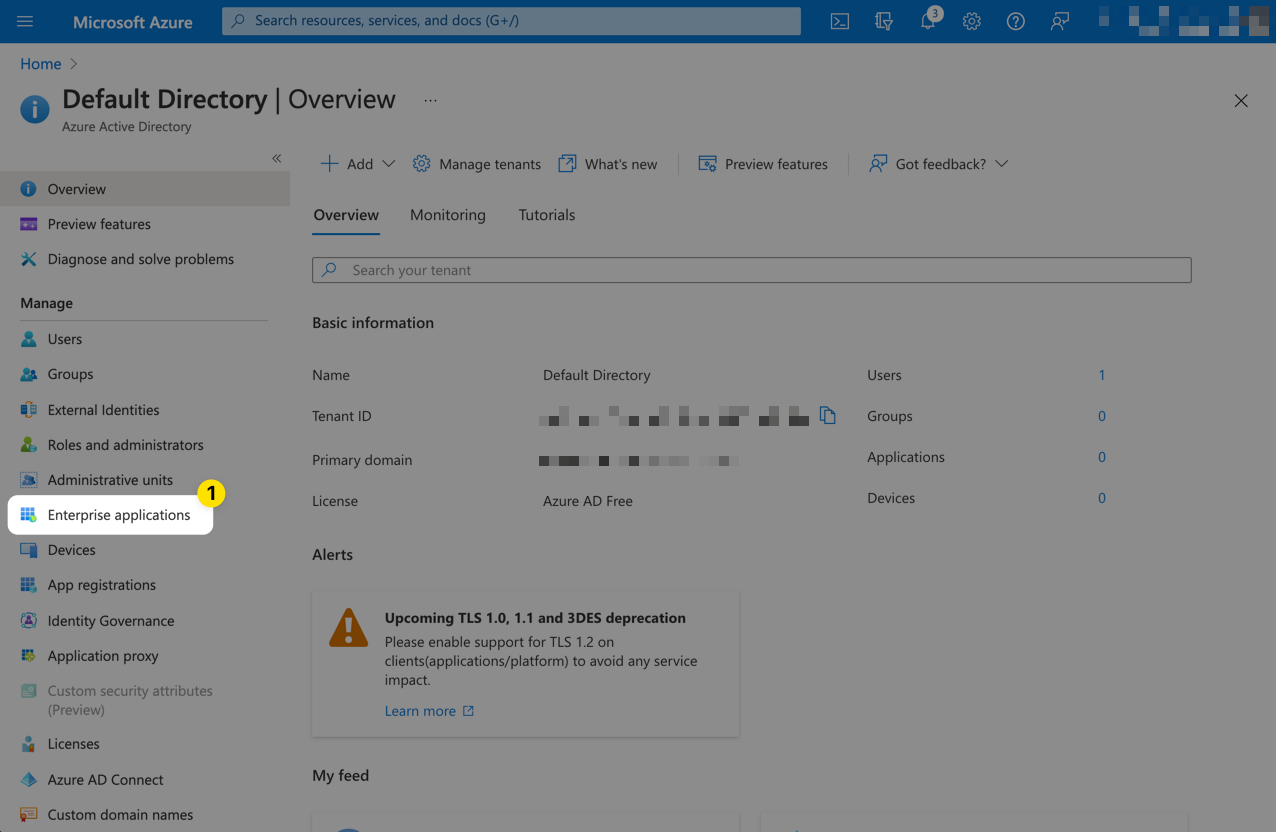
In the Enterprise applications pane, select New application.
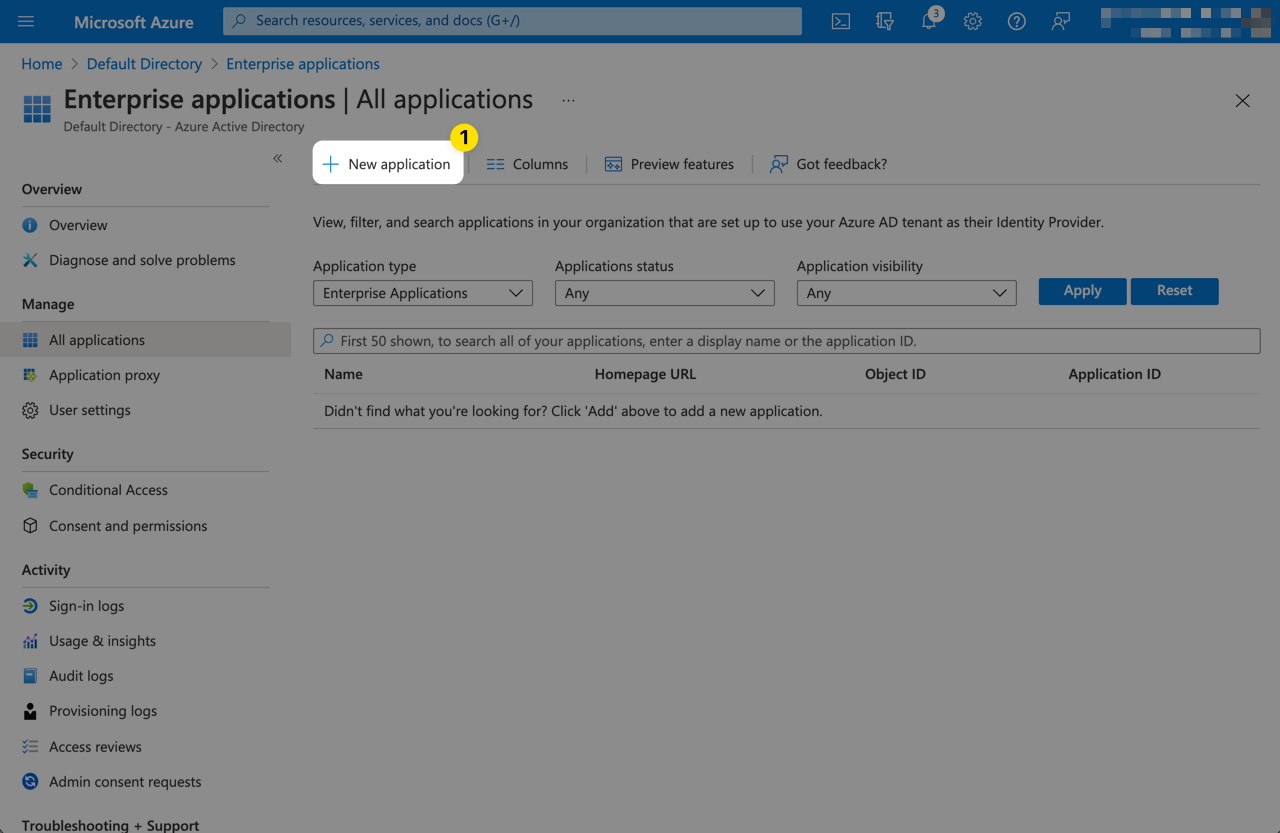
From the Browse Microsoft Entra Gallery page, click Create your own application.
Give the application a name of your choosing such as Doppler SAML. Then click Create.

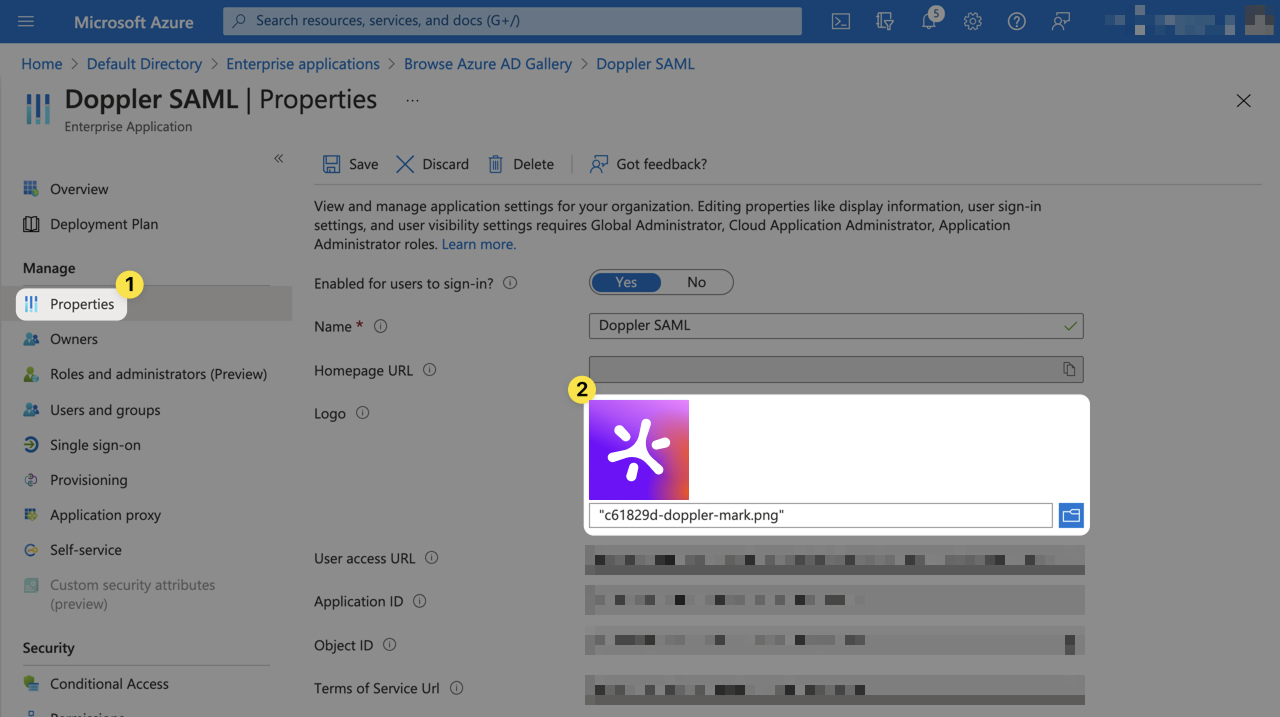
Click on Properties from the left menu. Set the logo for the application by uploading the image below, then click Save.

2. Initial Doppler SAML SSO Configuration
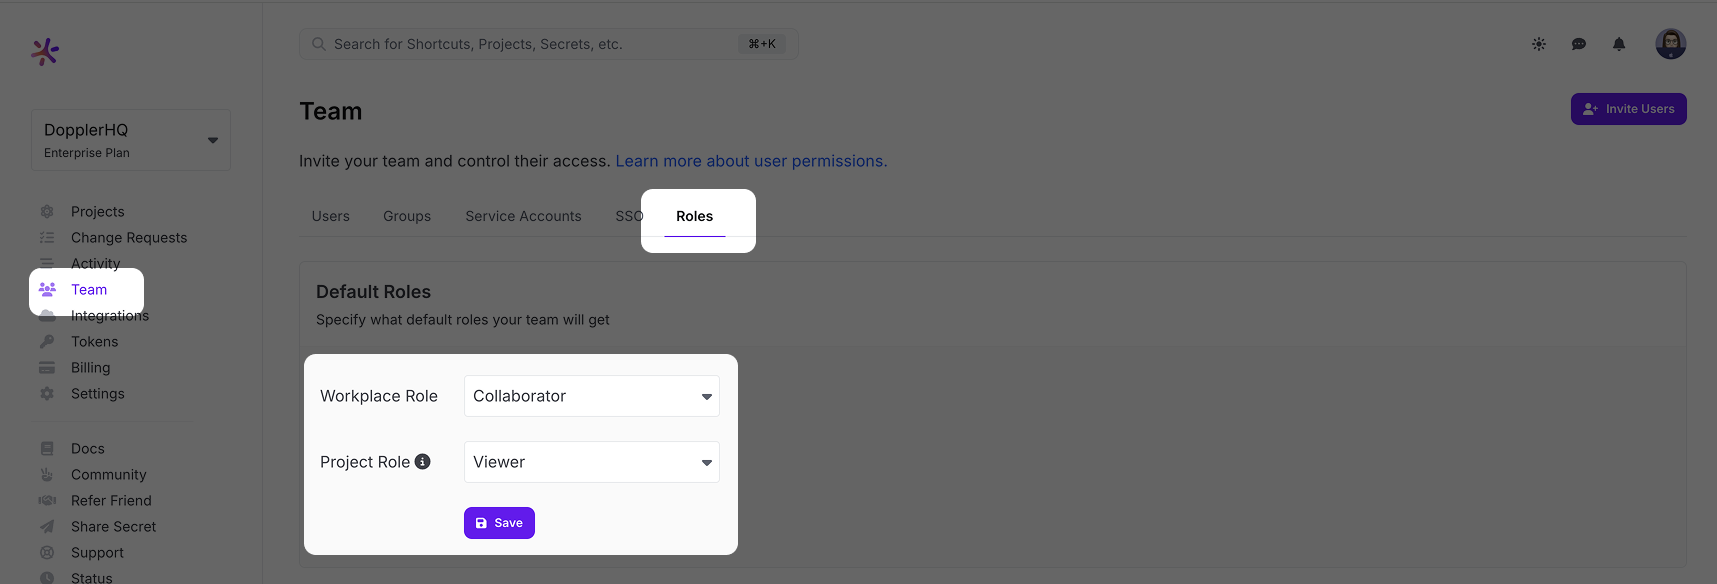
Go to the Doppler dashboard and from the menu click Team, then select the Roles tab from the top menu. Choose the Default Roles for users who login via SSO.
The Workplace Role controls the initial permissions a user will receive when their account is created. We recommend keeping it at Collaborator access to follow the principle of least privilege. The Project Role is the role granted to a user when they're added to a project, so set this to the role most commonly used. Users with the Owner role can adjust these after the user has logged in once. If you scroll down further on the Roles page, you'll see a breakdown of what permissions each Role has.
After setting the Default Roles, we need to enable SAML SSO in Doppler to get access to the URLs needed to configure the third party SAML SSO application.
Select the SSO tab from the top menu and scroll down to the SAML Single Sign-On section. Click the Add SAML button.

Next, choose a verified domain from the dropdown menu and click Save.
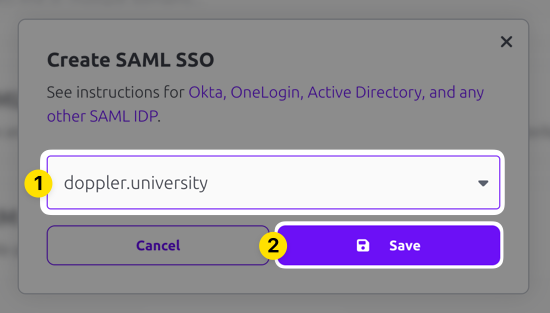
SAML SSO configuration requires having a domain associated with it because users login using their email address and the domain of that address is mapped back to your SAML SSO login. Verification is required when you add the domain to your account to confirm your ownership of the domain.
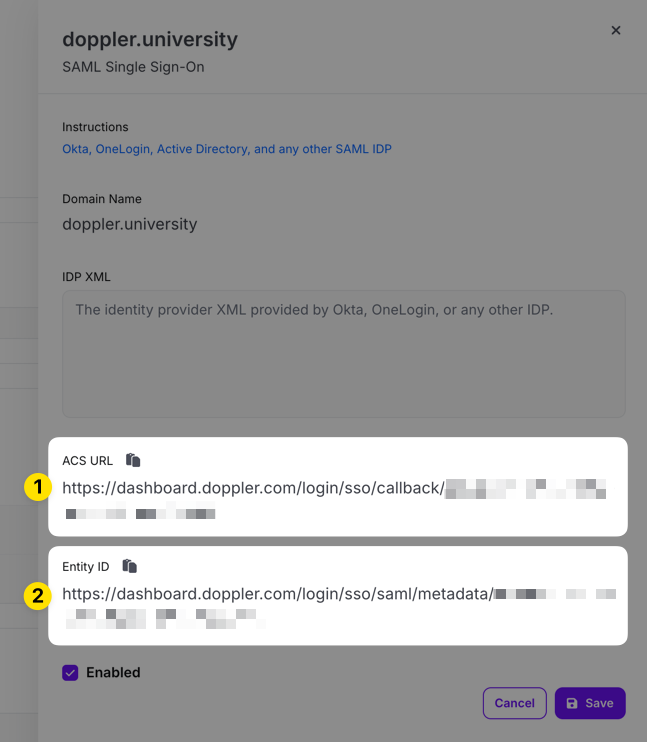
The domain you selected should show up now in the Inactive state. Click on the three dot menu and choose the Edit option.
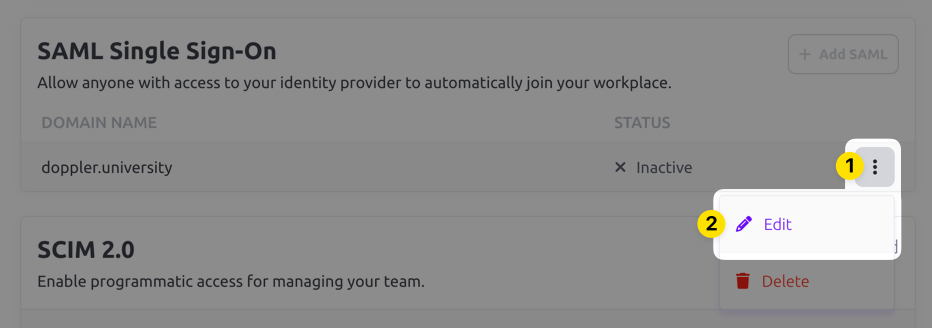
Copy the ACS URL and Entity ID URLs in the edit drawer that appears for use when configuring the third party SAML SSO application.
3. Entra ID SAML Configuration
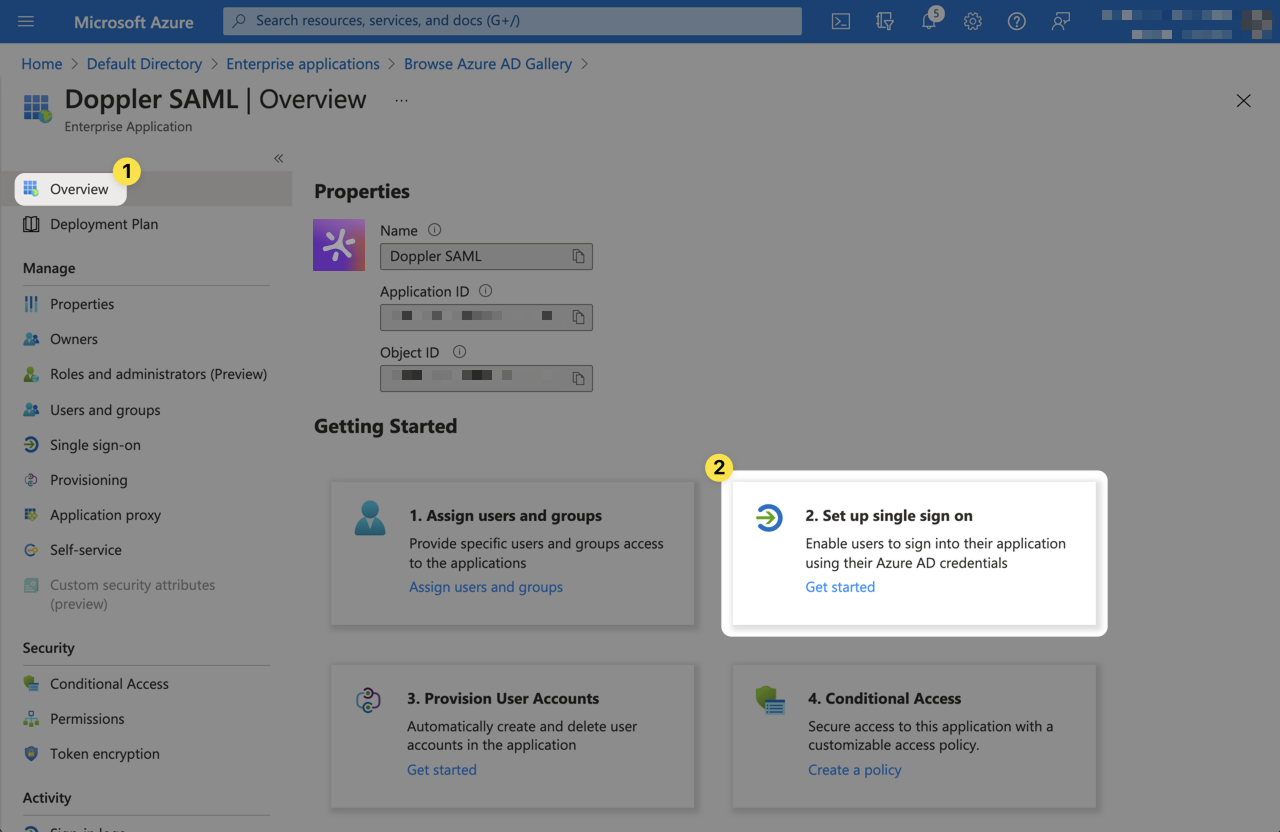
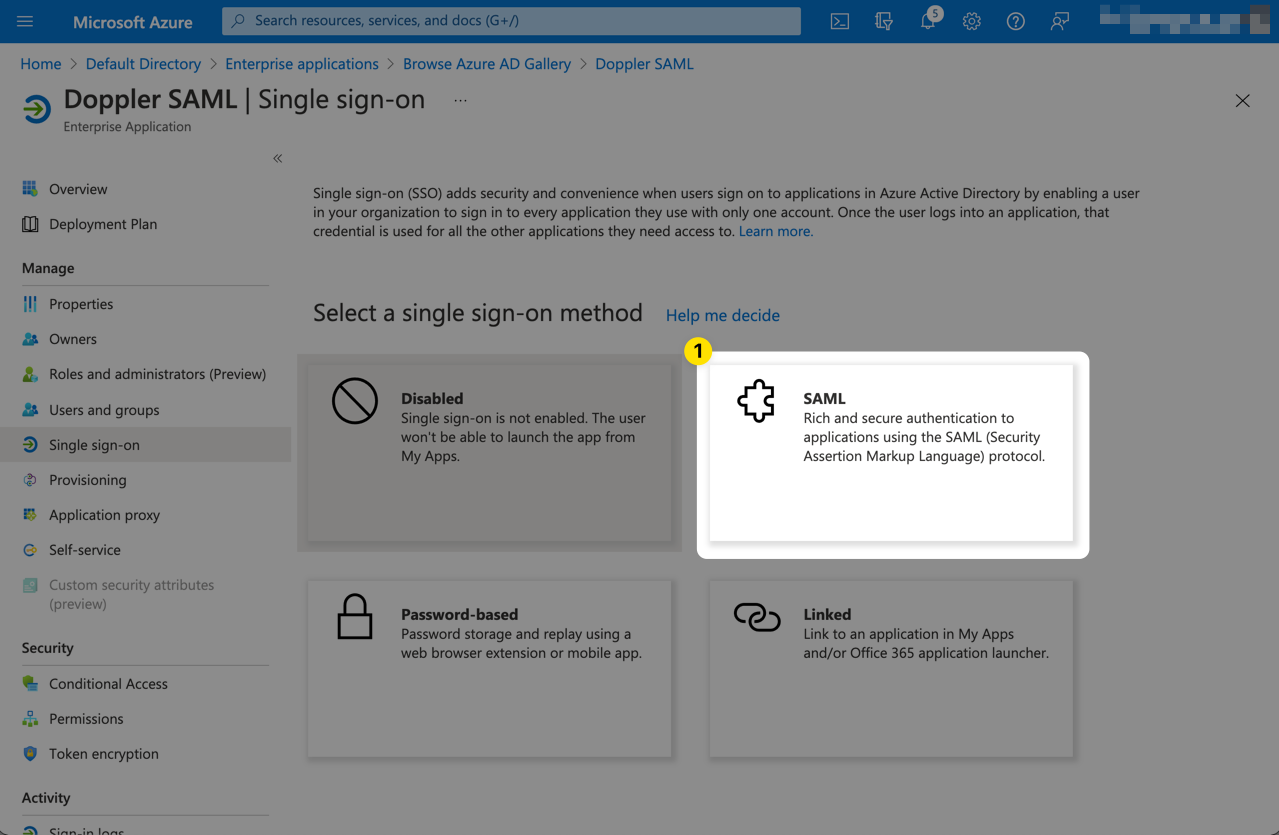
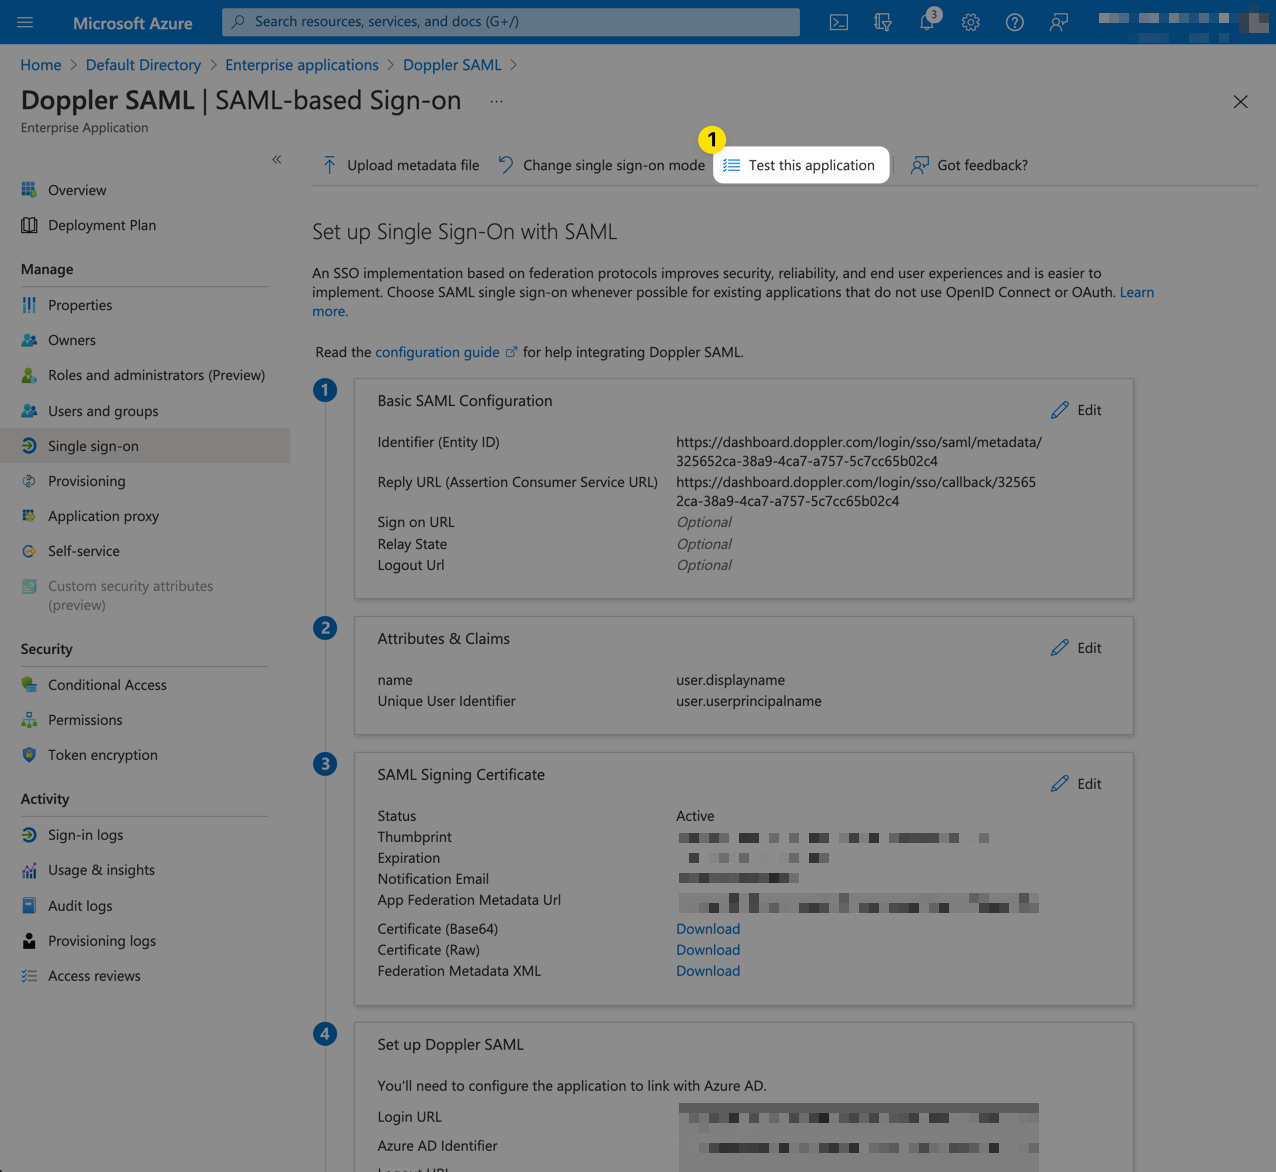
Next, we'll begin configuring the Entra ID SAML application. Switch back to the Entra ID Console window. Click Overview from the left menu. then select Get started from the 2. Set up single sign on section.
Select SAML as the single sign-on method.
Click Edit from the Basic SAML Configuration section.
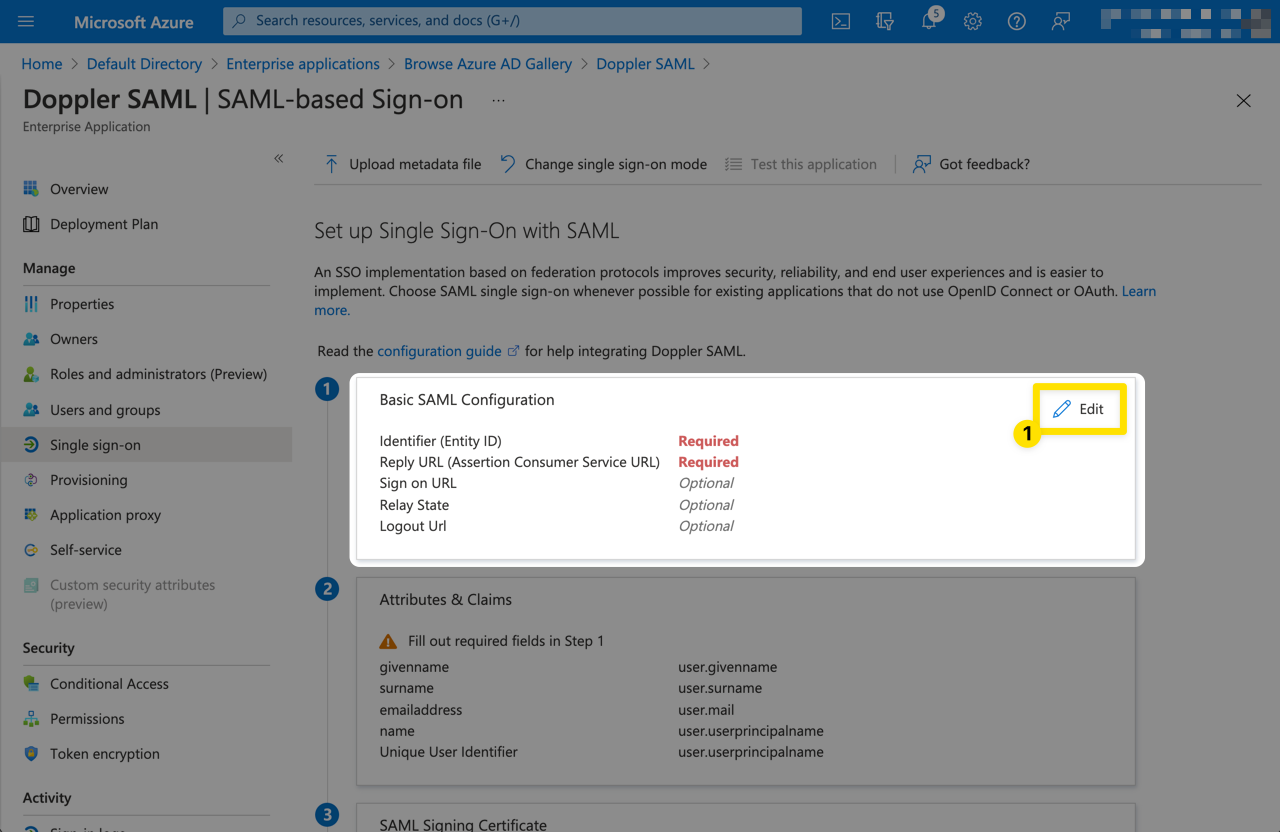
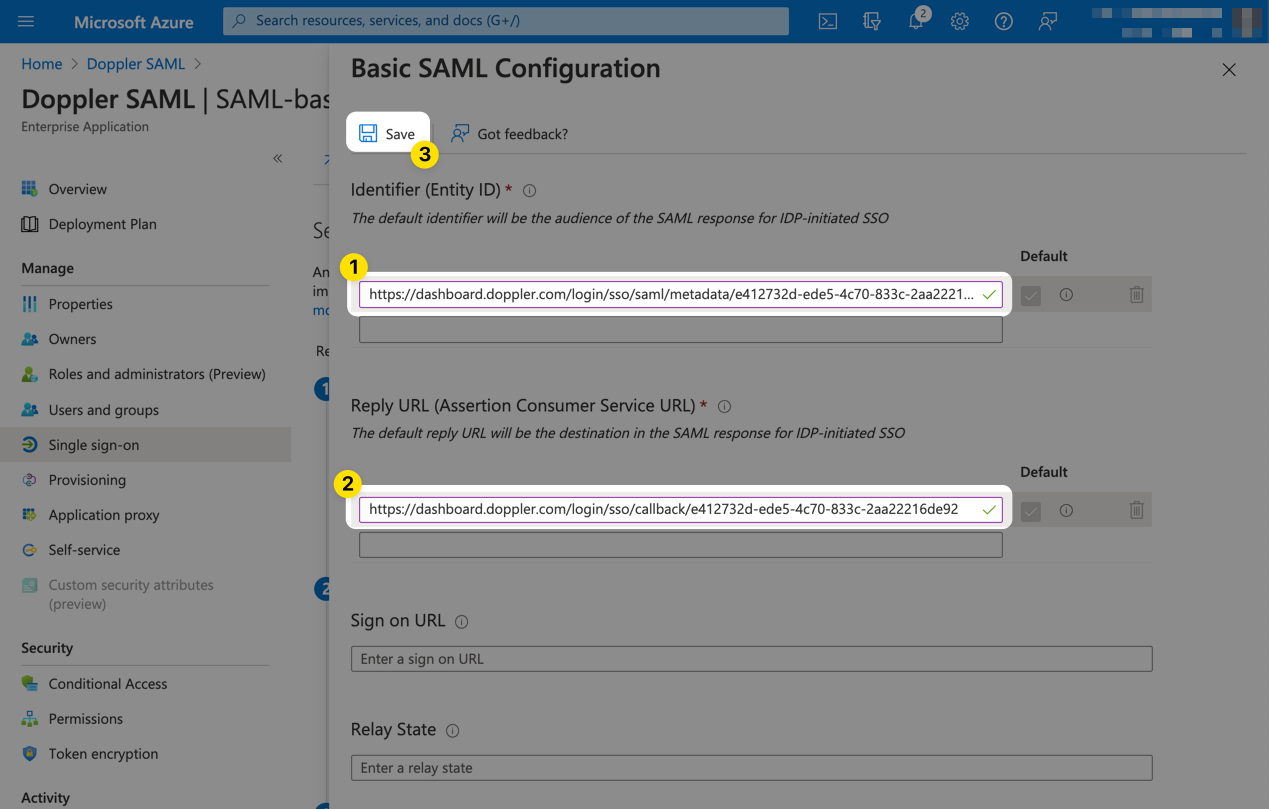
Then populate the form with the URLs obtained from the Doppler SAML Single Sign-On setup page in Step 2 above. They will look similar to the following:
| Field | Value |
|---|---|
| Identifier (Entity ID) | https://dashboard.doppler.com/login/sso/saml/metadata/$UUID |
| Reply URL (Assertion Consumer Service URL) | https://dashboard.doppler.com/login/sso/callback/$UUID |
These are example URLs only and will not work in your setup. You need to use the URLs obtained from the Doppler SAML Single Sign-On setup page referenced in Step 2 above.
The form should then look similar to the following. Then click Save.
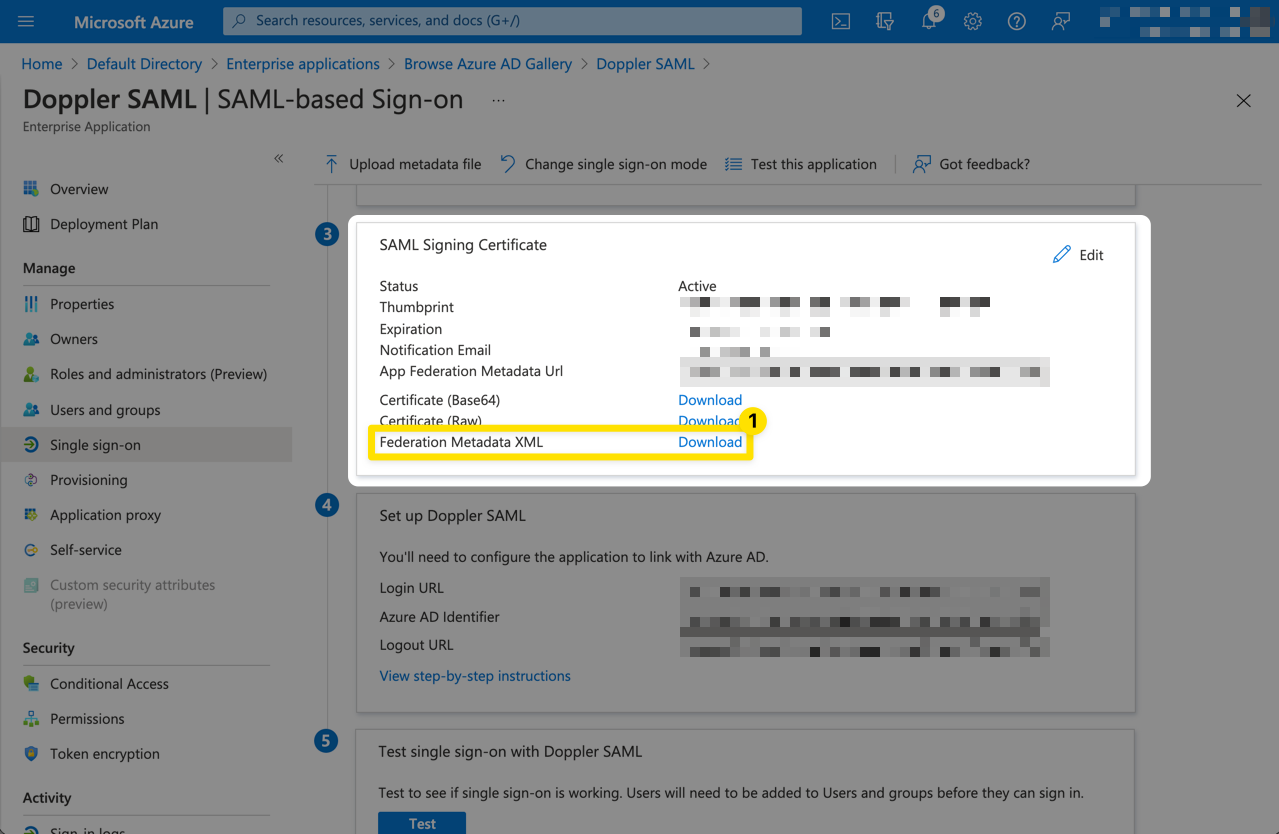
If a Test single sign-on prompt appears, click No, I'll test later as we're not yet ready to test.

Scroll down to the SAML Signing Certificate section and click the Download link for the Federation Metadata XML which we'll then upload into Doppler.
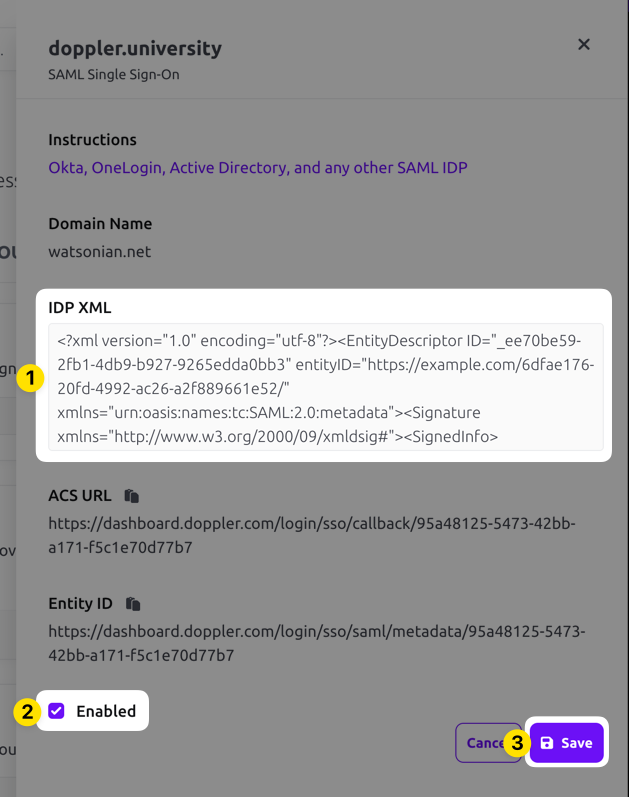
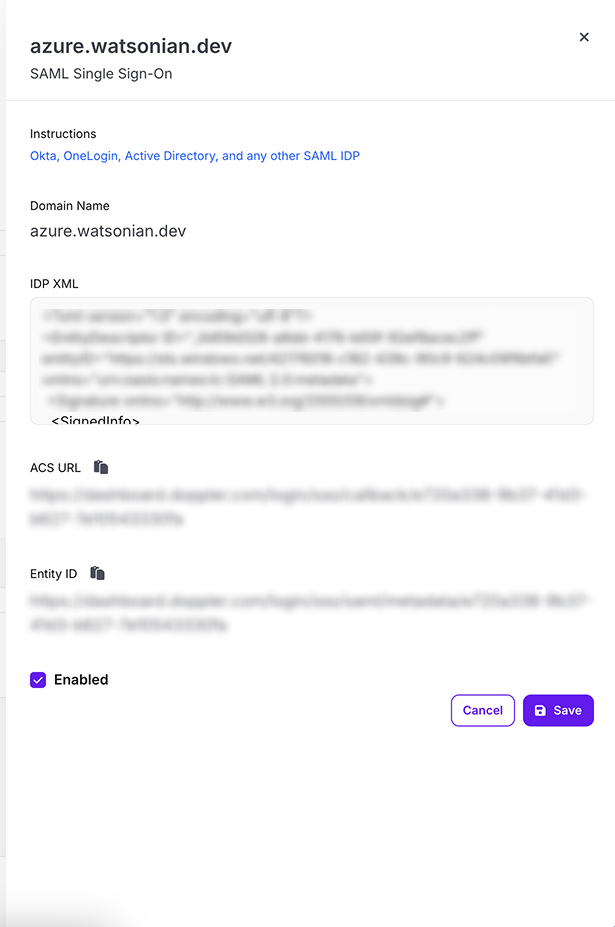
4. Update Doppler SAML SSO Configuration
Navigate to the Doppler Team page and click on the SSO tab.
Scroll down to the SAML Single Sign-On section, click on the three dot menu, and choose the Edit option. Paste in the IDP XML metadata, check the Enabled field, then click the Save button.
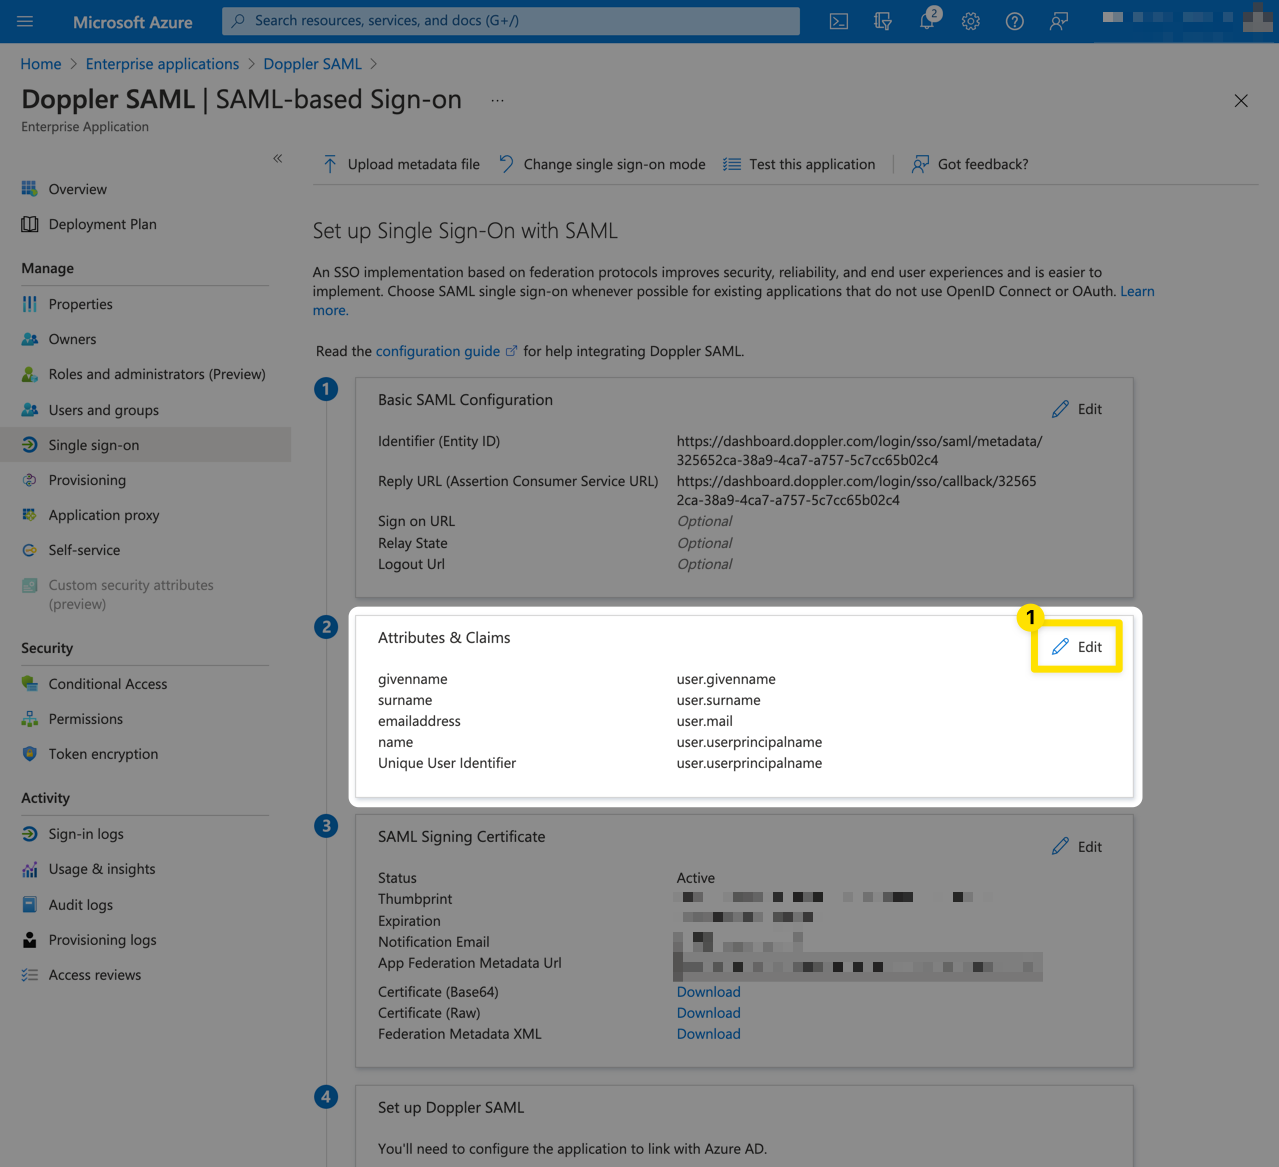
5. Entra ID SAML Attributes and Claims
Now we need to configure the data sent to Doppler by the Entra ID SAML application.
From the Setup Single Sign-On page, click Edit from the User Attributes & Claims section.
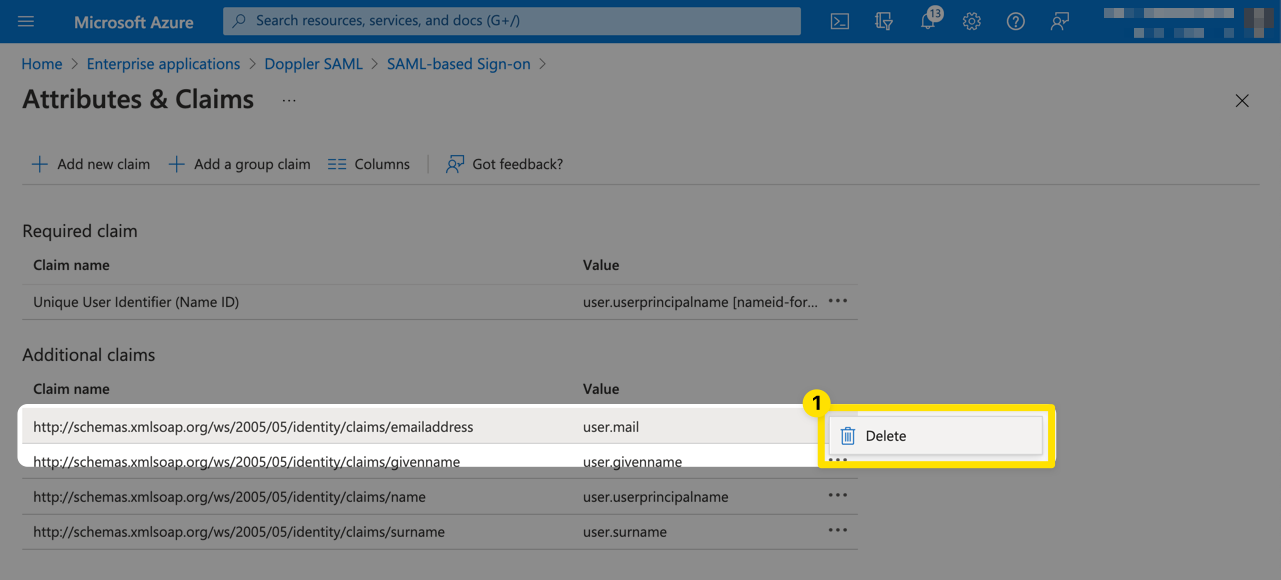
Delete the user.mail claim.
Next, delete the user.givenname claim.
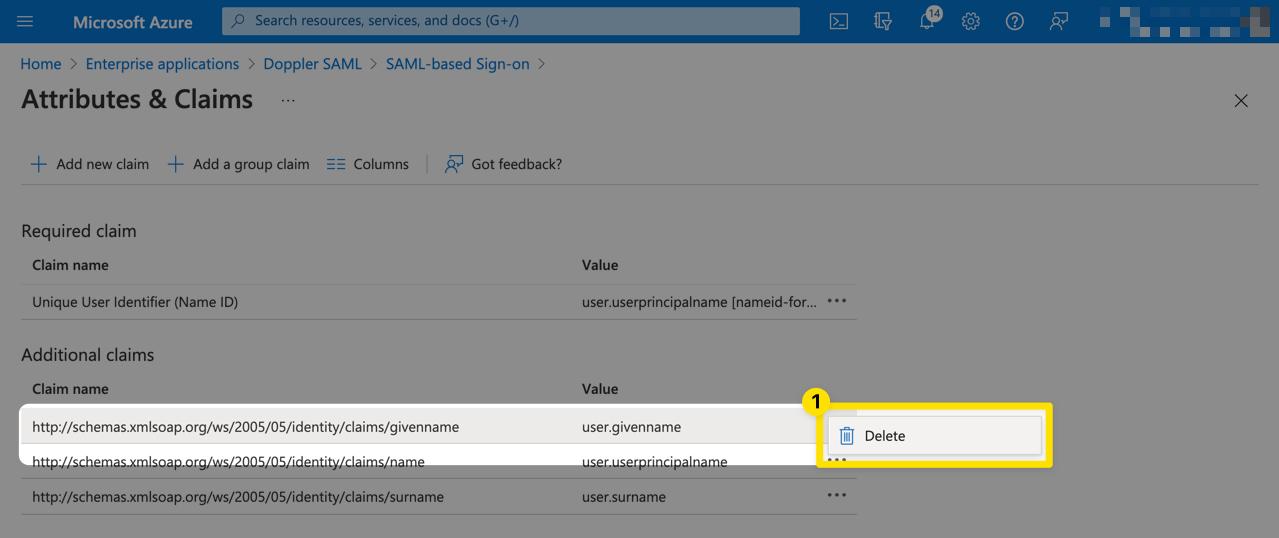
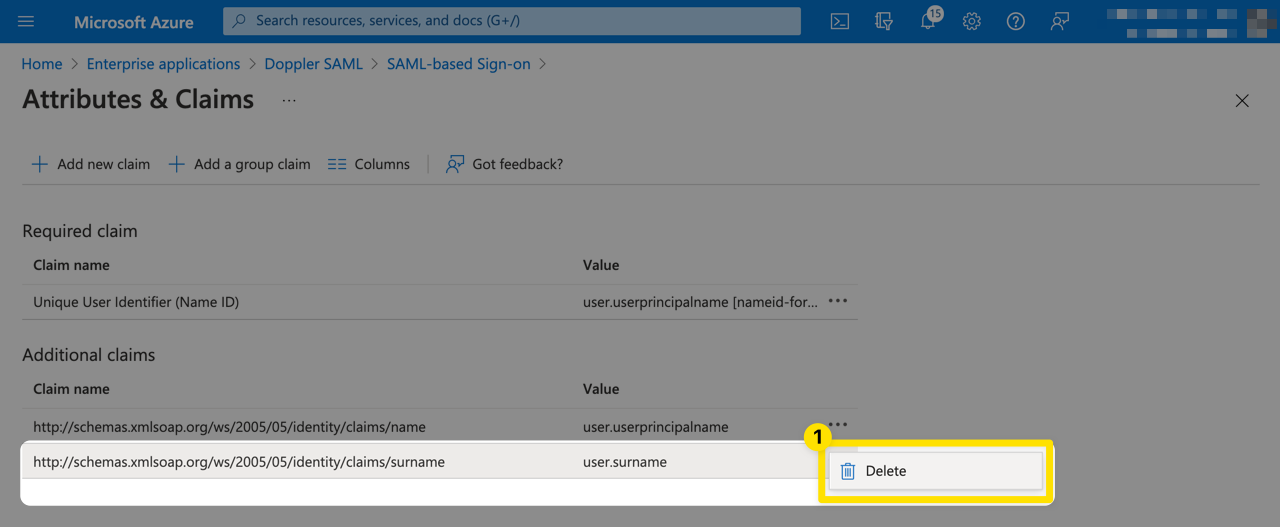
Next, delete the user.surname claim.
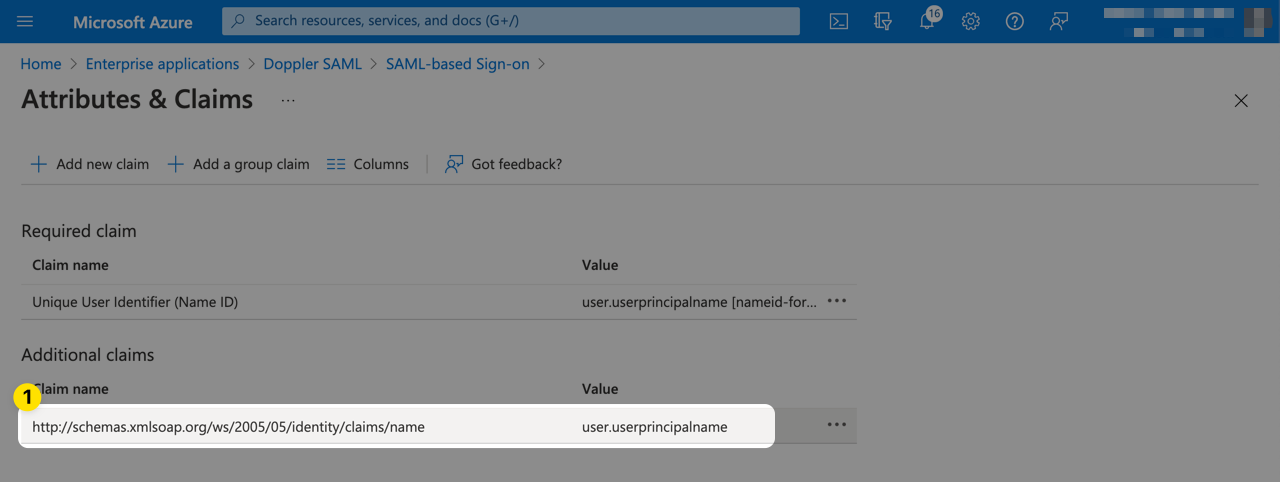
Next, click on the user.userprincipalname claim to edit it.
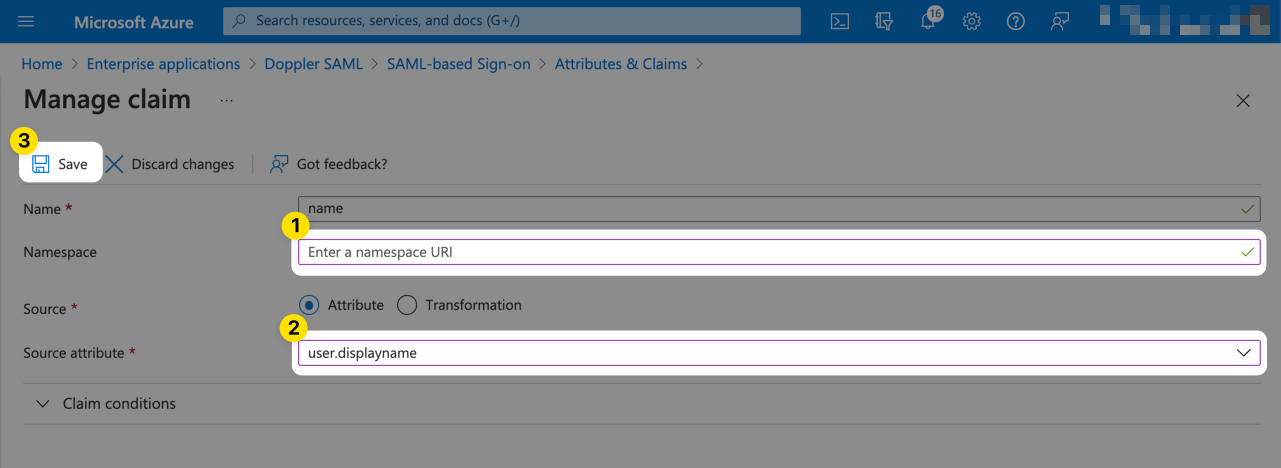
Delete the value for Namespace and change the Source attribute to user.displayname.
If the Name (user.displayname) field for your users is not set because only First Name and LastName are populated, you'll need to create a Transform to join these two fields together.

Click the Save button to apply the changes for the name claim.
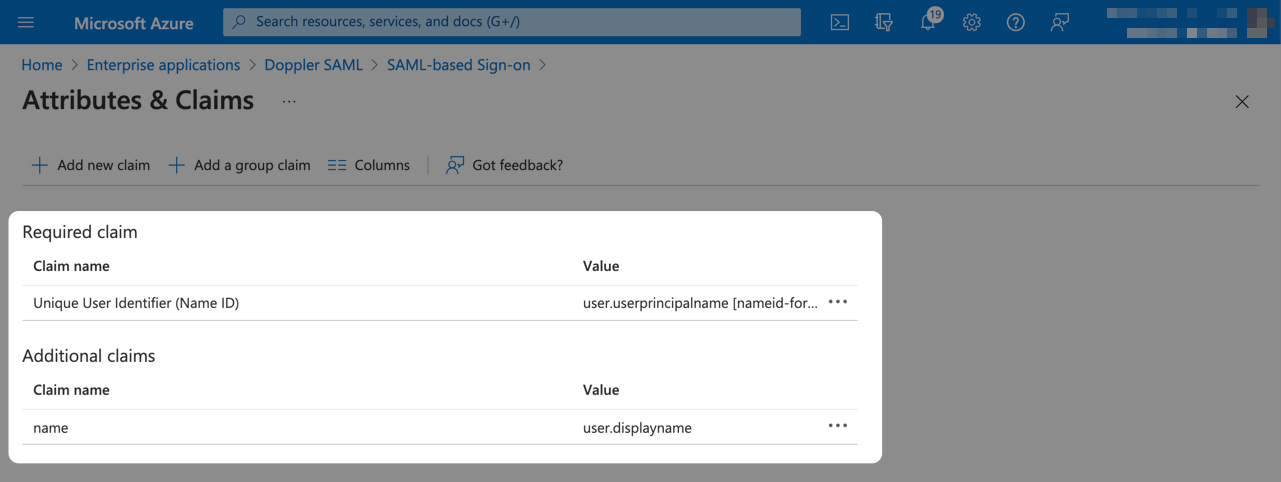
The completed result should look like the following.
6. Enable Doppler SAML SSO
You can now enable SAML SSO in Doppler. Check the Enable checkbox and then click Save.
With the app configured and SAML SSO enabled, you can now proceed with testing!
7. Testing
We highly recommend testing with a different account in case an error is encountered which could lock you out of Doppler.
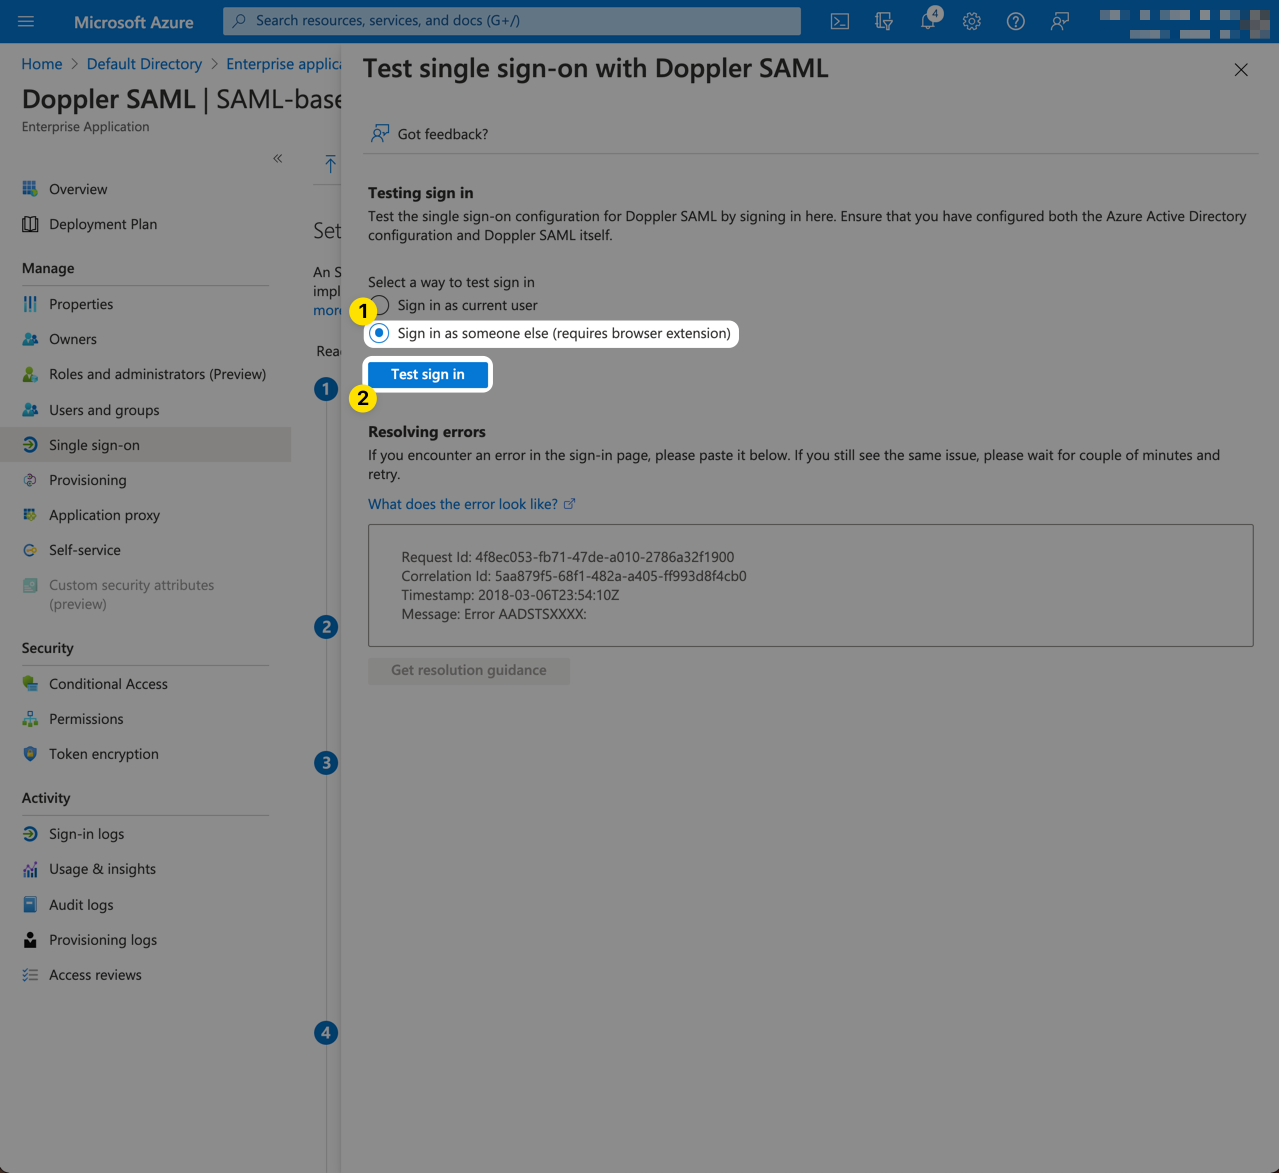
Once a test user has been created and assigned to the Doppler SAML application, click the Test this application button to bring up the testing panel.
Then click Sign in as someone else.
This functionality requires a Microsoft browser extension to be installed. You'll see a banner prompt for it and the Sign in as someone else option will be disabled until you have the extension installed.
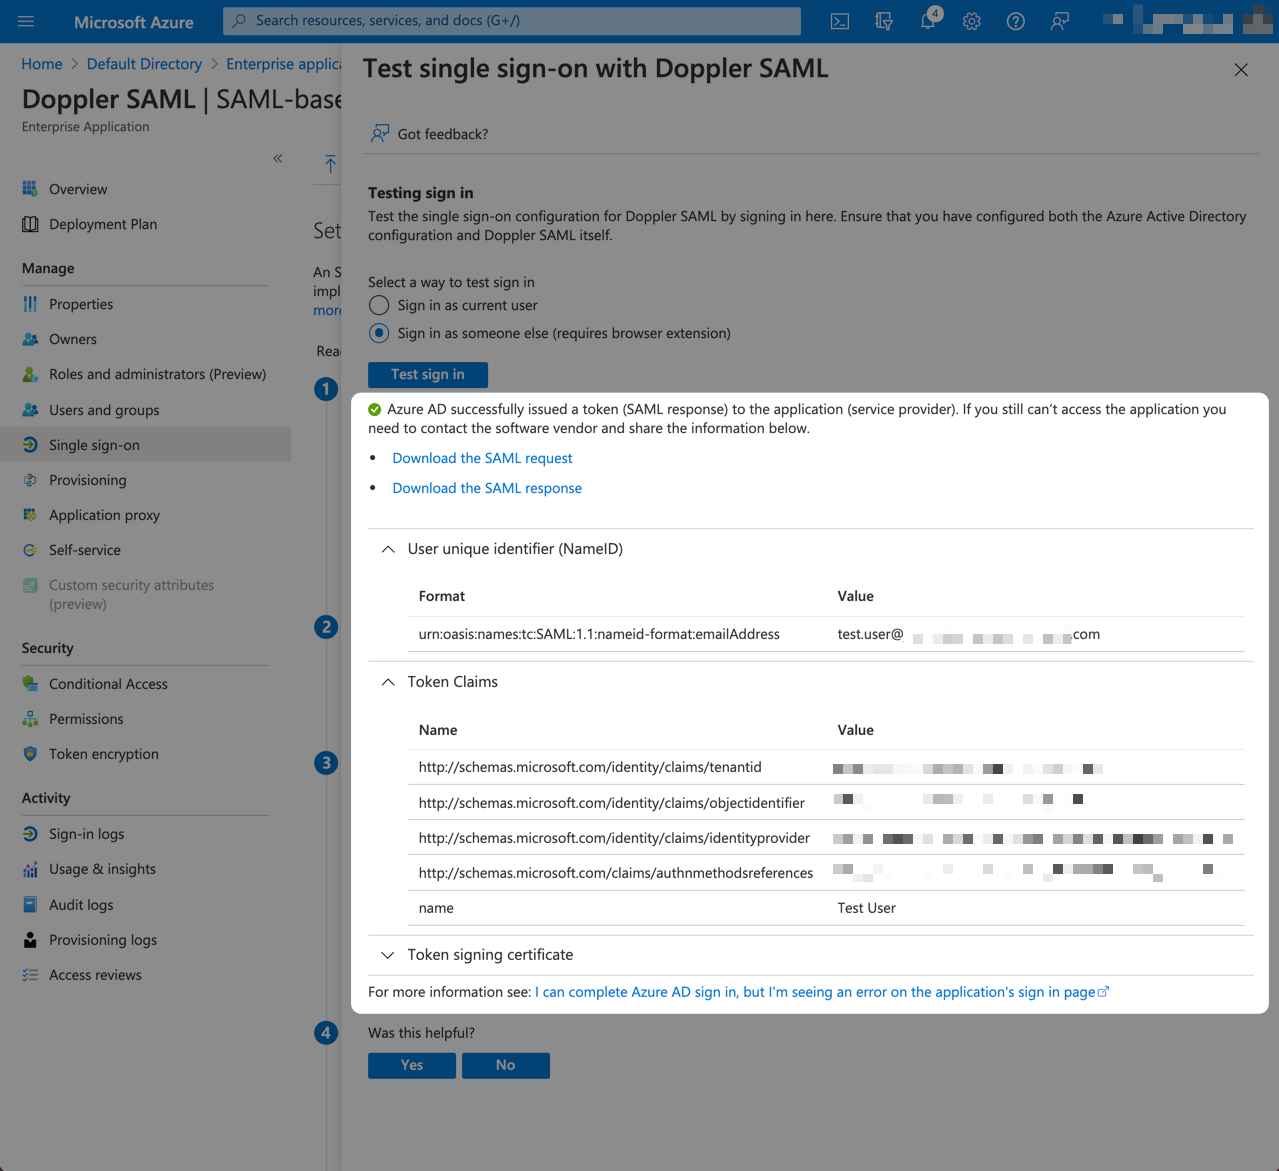
Once you've signed into Azure as the test user, the test will be performed.
If an error occurs, contact us using our in-product support or email [email protected], pasting into the email the error response, as well as the contents of the Download the SAML request link (don't attach the XML file as Intercom prevents the viewing of XML files).
If during testing you are presented with a Doppler error page, also paste in the Request Id shown on that page so we can look up the error on our end.

If the test was successful, great job! You're now ready to start assigning users to the Doppler SAML application.
We recommend further testing your SAML configuration by attempting to login to Doppler in an Incognito Window. To do that, open an Incognito tab at https://dashboard.doppler.com and enter the email address of the test user, then follow the login flow. If SAML is configured properly, you should be able to login successfully.
Doppler SAML User Assignment
Assigning users to the Doppler SAML application and adjusting Self-Service options such as the ability to request access and whether approval is required is the next step but is beyond the scope of this tutorial as each organization will handle things differently.
Check out Azure's guide on application user assignment.
Doppler Project Access
Now that your Active Directory users can sign into Doppler via SAML SSO, the final step is to assign access to Projects in Doppler.
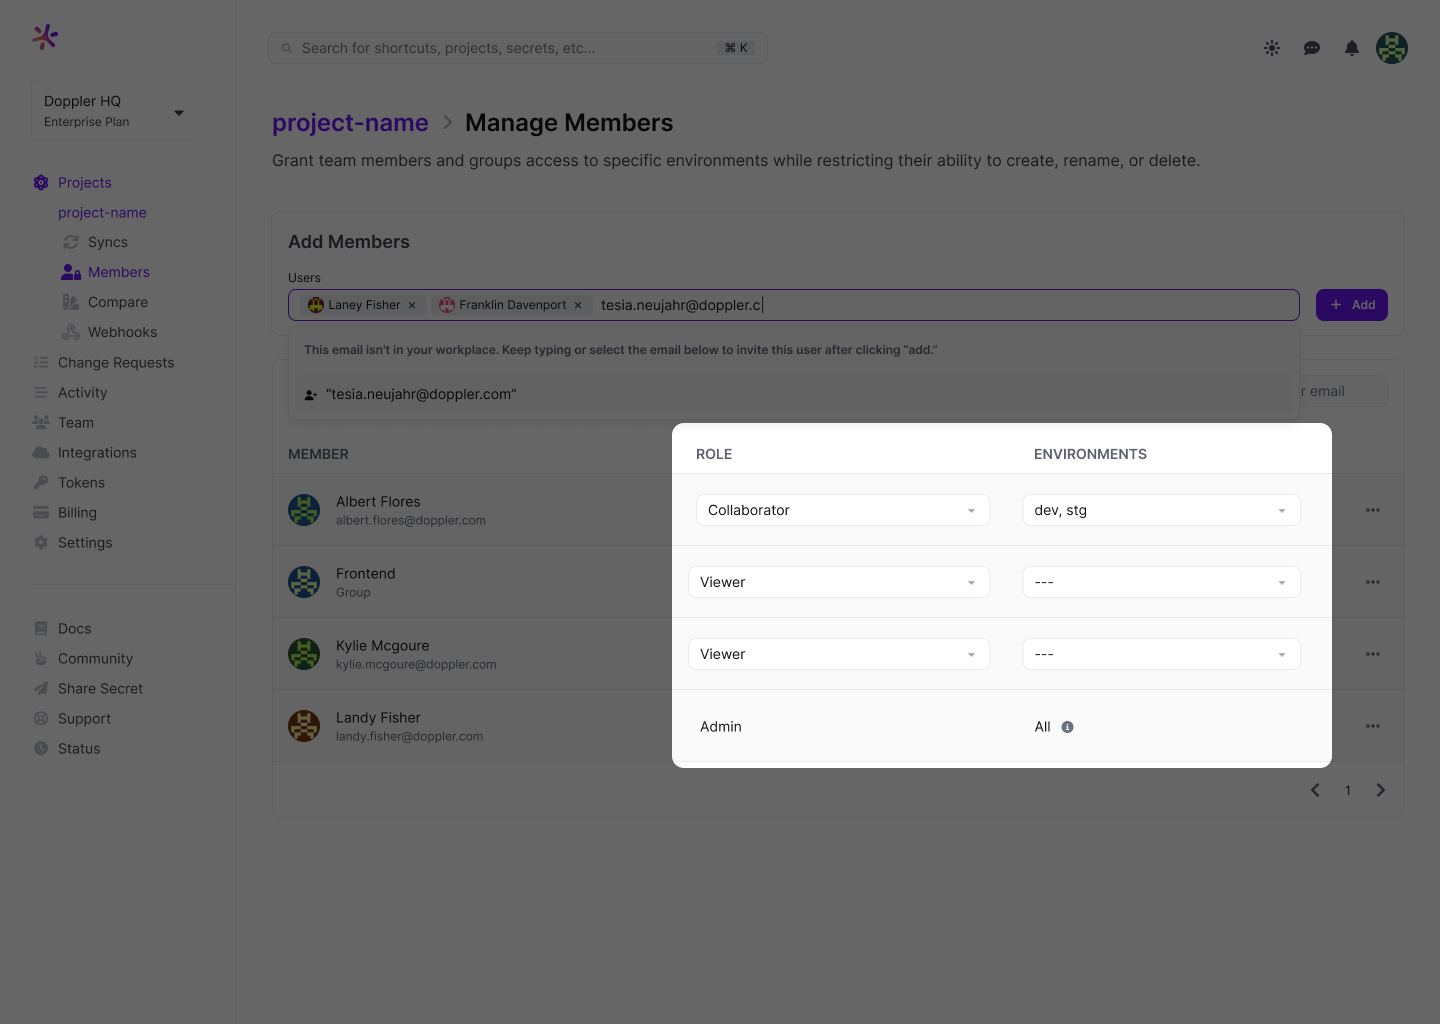
Navigate to a Doppler project and click on Members.
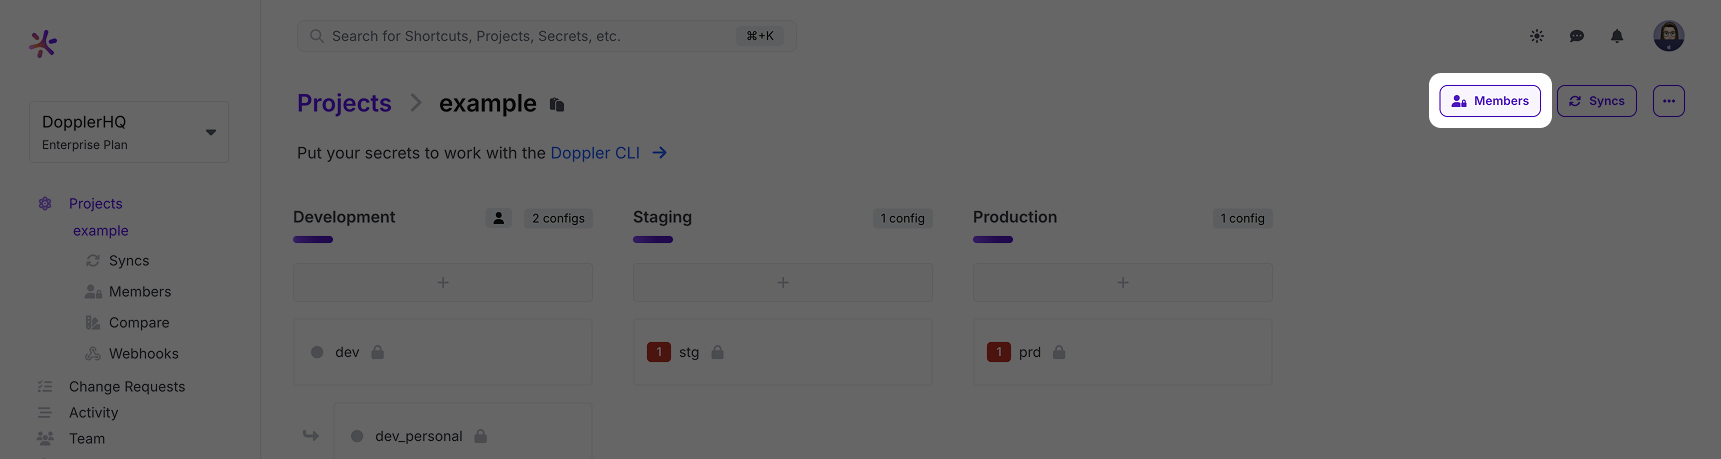
Then search for and select the user(s) and click Add.
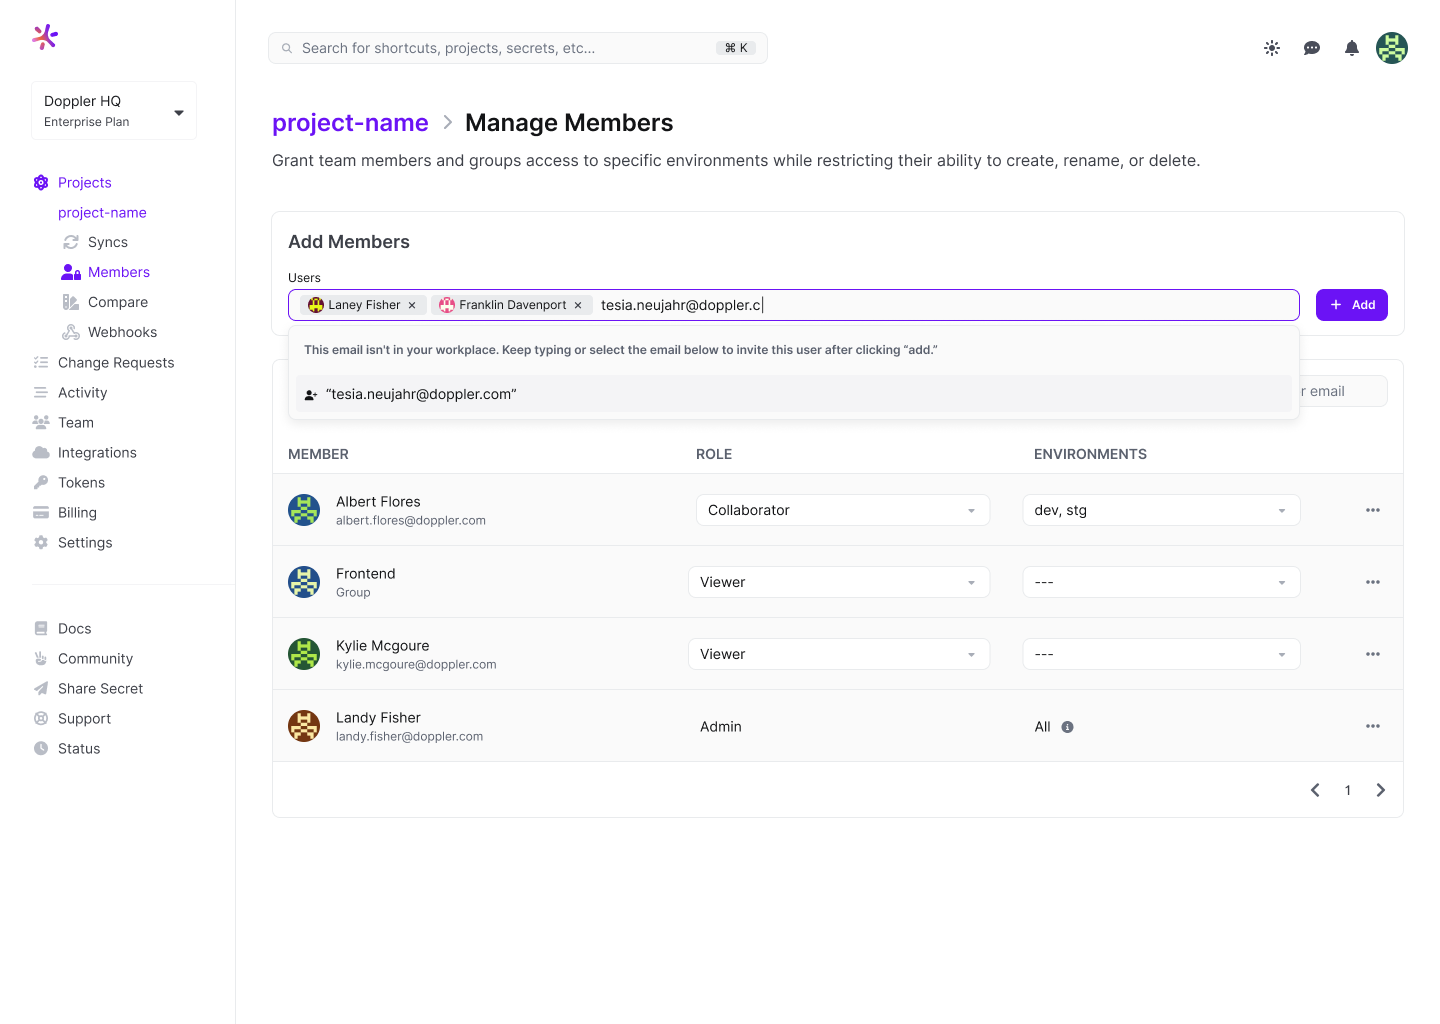
Once the user has been added to the project, select which environments they can access.
Awesome Work!You've successfully created a Microsoft Entra ID SAML application for signing into Doppler using SSO and assigned them access to a Doppler project.